If you’ve ever moved a page, changed a permalink, or switched domains on your WordPress site, you’ve probably run into the dreaded 404 error. I’ve been there — and trust me, it’s not just an annoyance for your visitors. It quietly hurts your search rankings, drains your link equity, and makes your site look unprofessional. The fix? Learning how to redirect a URL in WordPress the right way.
In this guide, I’ll walk you through everything — what a redirect is, the different types, how to use the .htaccess file, and the simplest ways to handle WordPress URL redirects using a plugin (including my personal favorite, Rank Math). Whether you’re a beginner or a seasoned site owner, this guide has you covered.
How to Redirect a URL in WordPress (Quick Steps)
- Go to Rank Math → Redirections
- Click “Add New”
- Enter old URL and new URL
- Select 301 redirect
- Save
What Is a URL Redirect?
A URL redirect is a server-side instruction that automatically sends a visitor — and search engines — from one URL to a different one. It is commonly used when a page is moved, deleted, or its URL changes. Think of it like mail forwarding when you move houses: any letter sent to your old address gets automatically routed to your new one.
When someone types an old URL into their browser or clicks on an outdated link, the server instantly points them to the correct destination. The user barely notices — but what happens behind the scenes is critical for both user experience and SEO.
How Redirects Work (Simple Explanation)
When you enter a URL:
- Browser requests the page
- Server responds with a redirect status (301/302)
- Browser automatically loads the new URL
This happens in milliseconds.
Why do redirects matter for your WordPress site?
- Preserve SEO value: Every backlink pointing to a page carries authority. Without a redirect, that authority disappears into a 404 error.
- Protect user experience: Nobody enjoys hitting a dead end. Redirects keep visitors on your site and moving toward the content they’re looking for.
- Maintain link equity: A 301 redirect passes 90–99% of ranking power to the new URL, so your hard-earned SEO doesn’t vanish overnight.
- Avoid crawl budget waste: Bots that hit too many broken pages may deprioritize your site in their crawl schedule.
Types of URL Redirects
There are five HTTP redirect status codes — 301, 302, 303, 307, and 308 — but in practice, most WordPress users only need to worry about two of them. Here’s a full breakdown so you always know which one to use.
| Code | Name | When to Use |
|---|---|---|
| 301 | Permanent Redirect | Page permanently moved. Passes 90–99% SEO value. Use for almost all WordPress URL changes — slug updates, domain migrations, deleted pages. |
| 302 | Temporary Redirect | Page temporarily moved. Search engines keep the old URL indexed. Only use when you genuinely plan to restore the original URL. |
| 303 | See Other | Redirects after a form submission. Rarely needed in WordPress — you’ll likely never use this one. |
| 307 | Temporary (HTTP/1.1) | Like 302 but HTTP/1.1 compliant and preserves request method. Mostly technical use cases. |
| 308 | Permanent (HTTP/1.1) | Like 301 but preserves the request method. A modern alternative to 301, increasingly supported by browsers. |
Bottom line: For almost every WordPress redirect scenario, use a 301. It’s the most SEO-friendly and tells search engines the content has a new permanent home.
What About Meta Refresh — Should You Use It?
Meta refresh is a client-side redirect set using an HTML tag in the page’s <head>:
<meta http-equiv="refresh" content="0; url=https://yoursite.com/newpage.com/">
Unlike 301 or 302 redirects which happen at the server level, meta refresh runs in the browser after the page has already started loading. There are a few reasons you should avoid it:
- It’s slower — the old page partially loads before the visitor gets sent to the new one
- It does not reliably pass SEO value to the destination URL
- Google has historically treated it with suspicion, especially with a delay (e.g., content=”5″ shows the old page for 5 seconds before redirecting)
- It creates a poor user experience, particularly on slower connections
If you come across a meta refresh on your site — in a theme, a page builder setting, or an old plugin — replace it with a proper 301 redirect using Rank Math or the .htaccess method instead.
When Should You Redirect a URL in WordPress?
Here are the most common situations where setting up a redirect is the right move:
- Deleted or moved a page: Any links pointing to that old URL will throw a 404. Redirect to the closest alternative.
- Changed a permalink or slug: Even small URL changes break old links. WordPress doesn’t automatically redirect the old slug to the new one.
- Migrating to a new domain: Whether rebranding or switching hosts, redirects preserve your traffic and SEO authority.
- Restructuring your URL architecture: Changing permalink structures requires redirects across multiple URLs — wildcard redirects help here (more on this below).
- Merging two posts or pages: If you consolidate content, redirect the old URL to the updated page to preserve backlinks.
- Switching from HTTP to HTTPS: Redirecting all HTTP traffic to HTTPS is a critical step when installing an SSL certificate on your WordPress site.
- Fixing a URL typo in an email or print campaign: Create the mistyped URL as a page and redirect it immediately to the correct destination.
The .htaccess File and How It Handles Redirects
Before diving into the WordPress-specific methods, let’s cover the .htaccess file — because it’s the foundation of how server-level redirects work, and understanding it will make you a more confident site owner.
The .htaccess file is a hidden configuration file that lives in the root directory of your WordPress installation (usually the public_html folder). It controls how your Apache web server handles incoming requests — including redirects, URL rewriting, and access rules.
What a Default WordPress .htaccess File Looks Like
# BEGIN WordPress

RewriteEngine On

RewriteBase /

RewriteRule ^index\.php$ - [L]

RewriteCond %{REQUEST_FILENAME} !-f

RewriteCond %{REQUEST_FILENAME} !-d

RewriteRule . /index.php [L]

# END WordPress
Important: Always add your custom redirect rules ABOVE the # BEGIN WordPress line. WordPress may overwrite anything inside those comment markers when you save permalink settings.
How to Add a Redirect in the .htaccess File — Step by Step
- Access the file: Use an FTP client like FileZilla or your hosting provider’s cPanel File Manager. Navigate to your site’s root directory. Enable hidden files — .htaccess starts with a dot and is hidden by default.
- Back it up first: Download a copy of your .htaccess before touching it. A single syntax error can take your entire site offline.
- Add your redirect rule: Open the file in a plain text editor and add rules above the # BEGIN WordPress line.
For a simple 301 redirect:
Redirect 301 /old-page-slug/ https://yourdomain.com/new-page-slug/ - To redirect an entire directory (wildcard redirect):
RewriteEngine On

RewriteRule ^old-directory/(.*)$ /new-directory/$1 [R=301,L] - Save and test: Upload the file back if needed, then test the old URL in a private/incognito browser window to confirm it redirects correctly.
What About Nginx?
The .htaccess method only works on Apache web servers. Many managed WordPress hosting providers — including Cloudways, WP Engine, and Kinsta — run Nginx, which handles redirects differently. On Nginx, you need to edit your server configuration file with rules like:
server {

location = /old-page/ {

return 301 https://www.yoursite.com/new-page/;

}

}
Tip: If you’re on Nginx or not comfortable editing server config files, just use a plugin. Rank Math’s redirect module, covered below, works independently of your server type.
HTTP to HTTPS Redirect via .htaccess
If you’ve installed an SSL certificate and want to force all HTTP traffic to HTTPS, add these lines above the # BEGIN WordPress block:
RewriteEngine On

RewriteCond %{HTTPS} off

RewriteRule ^(.*)$ https://%{HTTP_HOST}%{REQUEST_URI} [L,R=301]
Note: Many modern hosting providers handle HTTP→HTTPS redirection at the server level automatically. Check your hosting dashboard before adding this manually — double redirects can cause issues.
How to Redirect a URL in WordPress
Now let’s get into the WordPress-specific methods. There are four main approaches: using Rank Math (my recommendation), using the dedicated Redirection plugin, using a premium SEO plugin like Yoast or AIOSEO, or adding PHP code directly. Let’s go through each one.
Method 1: Using Rank Math (Recommended — Free)
If you’re already using Rank Math for SEO, this is the easiest and most efficient way to manage redirects — without adding another plugin.
This is the method I personally use on my sites, and I’d recommend it to most WordPress users. Rank Math’s Redirection module is built right into the plugin — no separate tool needed — and it works on both the free and Pro versions. It’s one of the biggest advantages Rank Math has over competitors like Yoast SEO and AIOSEO, which lock redirects behind a paid upgrade.
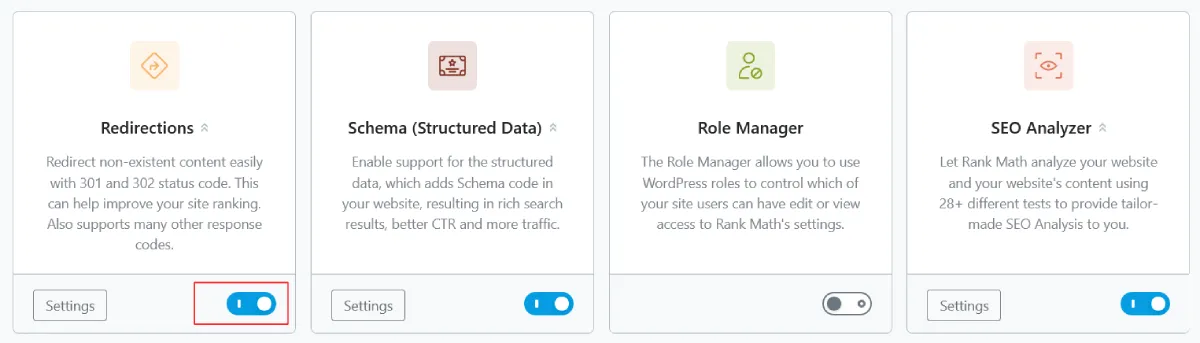
Step 1: Enable Advanced Mode and the Redirections Module
Rank Math’s redirection feature only appears in Advanced Mode. Here’s how to get there:
- Go to Rank Math SEO → Dashboard in your WordPress admin.
- Click Switch to Advanced Mode if you’re currently in Easy Mode.
- Scroll down in the Dashboard modules list and toggle on Redirections.
- Optionally, also enable the 404 Monitor — this tracks every broken URL your visitors hit, making it easy to spot what needs a redirect.
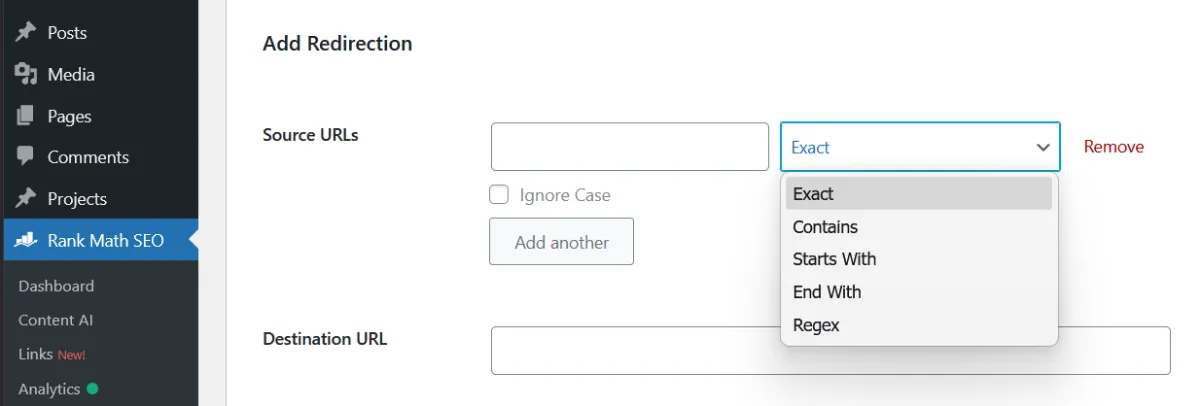
Step 2: Add a Redirect
- Navigate to Rank Math SEO → Redirections.
- Click the Add New button at the top.
- In Source URL, enter the old URL path (e.g., /old-blog-post/).
- In Destination URL, enter the full new URL (e.g., https://yourdomain.com/new-blog-post/).
- Under Redirection Type, select 301 Permanent Move for a standard permanent redirect.
- Click Add Redirection. Done.

Rank Math Match Types — More Power Than You’d Expect
One of Rank Math’s standout features is its Match Type options, which let you create wildcard or pattern-based redirects without editing .htaccess. When adding a redirect, you can choose from:
- Exact: Redirects only the specific URL you enter. Good for individual page redirects.
- Contains: Redirects any URL that contains a specific word or phrase. Useful for redirecting a whole topic area.
- Starts With: Redirects all URLs beginning with a specific slug — great for old category structures.
- Ends With: Redirects URLs ending with a specific term.
- Regex: Advanced pattern matching for complex scenarios. Powerful but use carefully — a bad regex expression can accidentally redirect large chunks of your site.
Bonus: Enable the 404 Monitor alongside Redirections. Rank Math logs every 404 error with the URL, hit count, and last access time. You can redirect broken URLs directly from the 404 Monitor screen with one click.
Auto-Redirect on Slug Changes
One thing I really appreciate about Rank Math: when you change a post or page slug in WordPress, Rank Math automatically creates a 301 redirect from the old URL to the new one. You don’t have to remember to set it up manually — it just happens. That single feature alone prevents a lot of accidental broken links on growing sites.
Method 2: Using the Redirection Plugin (Great Free Alternative)
If you’re not using Rank Math, the Redirection plugin by John Godley is the best standalone option. It’s free, has over 2 million active installations, requires zero coding, and also tracks 404 errors.
- Go to Plugins → Add New Plugin, search for “Redirection”, install and activate it.
- Complete the setup wizard that appears on first activation.
- Go to Tools → Redirection and scroll to Add new redirection.
- Enter the old URL in Source URL and the new URL in Target URL.
- Set the redirect type to 301 and click Add Redirect.
The plugin also auto-detects slug changes and creates redirects automatically — similar to Rank Math. The main difference: it’s a dedicated plugin adding extra weight to your site, whereas Rank Math handles redirects as part of a tool you likely already have installed.
Method 3: Using Yoast SEO Premium or AIOSEO Pro
Both Yoast SEO and AIOSEO include redirect management — but only in their paid versions. If you’re already paying for one of these, the redirect features are solid. If you’re on the free tier, you’d need to upgrade or use one of the free methods above.
- Yoast SEO Premium: Go to SEO → Redirects. Enter the old slug and destination URL, choose the redirect type, and save.
- AIOSEO Pro: Go to All in One SEO → Redirects, activate the Redirect Manager addon, then add your source and target URLs.
Want the full picture on how these stack up? Read this Rank Math vs Yoast SEO comparison and Rank Math vs AIOSEO comparison for a side-by-side breakdown of features, pricing, and which plugin is right for different types of sites.
Method 4: PHP in functions.php (No Plugin Required — Developer Option)
If you’d rather redirect a URL in WordPress without a plugin and are comfortable with PHP, you can add redirect logic directly in your theme’s functions.php file:
function my_custom_redirects() {

if ( is_page( 'old-page-slug' ) ) {

wp_redirect( home_url( '/new-page-slug/' ), 301 );

exit;

}

}

add_action( 'template_redirect', 'my_custom_redirects' );
Warning: Always add exit; after wp_redirect() to stop PHP execution. Also back up your functions.php before editing — a PHP error here can break your site’s front end.
Wildcard Redirects: Redirecting an Entire URL Structure
If you’ve changed your entire permalink structure — for example, from /category/post-name/ to just /post-name/ — you need a wildcard redirect that covers all URLs matching the old pattern at once. Doing this one by one would take forever.
In Rank Math, use the Starts With match type and set the destination with a $1 pattern to preserve the rest of the slug. In the Redirection plugin, enable Regex mode and use:
Source URL:  /old-category/(.*)$

Target URL:  /new-category/$1
Tip: If you’re on Apache, you can also handle this in .htaccess using the RewriteRule shown earlier. But doing it through Rank Math or the Redirection plugin is safer since it doesn’t require server file access.
How to Fix the “Too Many Redirects” Error in WordPress
If you’ve ever set up a redirect and then seen the ERR_TOO_MANY_REDIRECTS error in your browser, you know how frustrating it is. This error means your site has entered a redirect loop — Page A redirects to Page B, which redirects back to Page A, and your browser gives up.
Here are the most common causes and how to fix each one:
- Mismatched WordPress URL settings: Go to Settings → General and make sure the WordPress Address (URL) and Site Address (URL) fields match exactly — both should use the same protocol (https://) and the same www or non-www format.
- HTTP → HTTPS misconfiguration: If you’ve set up an SSL redirect in .htaccess but your hosting provider is also enforcing one at the server level, they can conflict. Check with your host and remove the duplicate rule.
- A redirect pointing back to itself: In Rank Math or the Redirection plugin, check that no redirect has the same URL in both the source and destination fields.
- Plugin conflict: Temporarily deactivate all plugins, then re-enable them one by one to identify the culprit.
- .htaccess error: Review your .htaccess file for conflicting rules. If you recently edited it, restore your backup.
Quick fix: Start by clearing your browser cache (or use a private window). Browsers aggressively cache 301 redirects — what looks like a loop might just be a cached old redirect.
Test Redirects on a Staging Site First
Before implementing bulk redirects or major URL structure changes on a live site, I strongly recommend testing on a staging environment first. A mistake with redirects — especially wildcard or regex rules — can accidentally redirect large sections of your site and hurt your search rankings.
- Most managed hosts (WP Engine, Cloudways, SiteGround) offer one-click staging environments from your hosting dashboard.
- Free tools like InstaWP let you spin up a temporary WordPress staging site without needing your own hosting.
Set up your redirects on staging, test every URL thoroughly, and only then push the changes to production.
Common Redirect Mistakes to Avoid
Avoid these issues to protect your SEO:
- Redirect chains (multiple redirects in sequence)
- Redirect loops (infinite loop errors)
- Using 302 instead of 301
- Not updating internal links
- Redirecting to irrelevant pages
WordPress Redirect Best Practices
- Always use 301 for permanent changes: Unless you’re running a temporary A/B test or maintenance page, a 301 is almost always the right choice.
- Avoid redirect chains: Don’t redirect A → B → C. Point A directly to the final destination C. Chains slow down your page load and dilute SEO value. Google typically follows up to five redirects in a chain, but anything beyond one is unnecessary overhead.
- Never redirect to your homepage: Redirecting every deleted page to the homepage might seem like a safe fallback, but it’s considered a soft 404 by Google and frustrates visitors who expected specific content.
- Update internal links: Redirects are a safety net, not a replacement for clean internal linking. After a URL change, update links in your posts, navigation menus, and anywhere else you reference the old URL.
- Keep 301 redirects in place for at least a year: Search engines need time to update their indexes. Removing a redirect too early can cause the old URL to resurface in results.
- Don’t create redirects for internal links and menus: If you’re manually building internal links, type the correct URL directly. Relying on redirects for navigation adds unnecessary load time.
- Audit your redirects periodically: Use Rank Math’s 404 Monitor, Google Search Console, or a crawler like Screaming Frog to review your redirect list and clean up chains, loops, or outdated rules.
How to Test Your WordPress Redirects
Once your redirects are set up, always verify they’re working before moving on:
- Manual browser test: Type the old URL in a private/incognito window and press Enter. You should land on the new URL automatically. Incognito mode avoids cached results.
- Redirect Checker tool: Use a free tool like httpstatus.io or Redirect Checker. Paste the old URL and it shows the full redirect chain, HTTP status codes, and final destination.
- Rank Math’s redirect debugger: In Rank Math SEO → General Settings → Redirections, enable Debug Redirections. Rank Math then shows an interstitial panel before each redirect fires, so you can see exactly what’s happening.
- Google Search Console: After bulk redirects or a domain migration, monitor the Coverage and URL Inspection reports in Search Console to confirm Google is picking up the changes.
Frequently Asked Questions
1. Does a 301 redirect pass link juice / SEO value?
Yes. A 301 redirect passes approximately 90–99% of the ranking power (link equity) from the old URL to the new one. This is why it’s the go-to option for permanent URL changes — you retain most of the SEO authority built up at the old address.
2. Will too many redirects slow down my WordPress site?
A small number of well-structured redirects has a negligible impact on site speed. The real problem is redirect chains (A → B → C) or having hundreds of unnecessary redirects. Each hop in a chain adds latency. Keep redirects direct and clean up any you no longer need.
3. Can I redirect a URL in WordPress without a plugin?
Yes — you can use the .htaccess file (on Apache servers) or the wp_redirect() function in your theme’s functions.php. Both are covered in detail above. That said, for most users a plugin like Rank Math makes the process significantly safer and easier to manage.
4. How long should I keep a redirect in place?
For 301 redirects, I recommend keeping them in place for at least 12 months. This gives search engines enough time to fully update their indexes and pass the ranking signals to the new URL. After a year, the volume of traffic hitting the old URL is typically minimal.
5. What’s the difference between Rank Math’s free redirect feature and the Redirection plugin?
Both do the job well. Rank Math’s advantage is consolidation — if you’re already using it as your SEO plugin, having redirects built in means one less plugin installed. The Redirection plugin is a dedicated tool and slightly more feature-rich in isolation (better bulk management UI, for example), but adds plugin overhead. If you use Rank Math, there’s no reason to also run the Redirection plugin.
6. Is Rank Math’s redirection feature really free?
Yes — the core Redirections module in Rank Math (301, 302, 307 redirects, match types, 404 Monitor) is available in the free version. The Pro version adds CSV bulk import/export, scheduled activation/deactivation of redirects, and advanced analytics. For most sites, the free version is more than sufficient.
7. My redirect isn’t working — what should I check?
Start with the basics: clear your browser cache or test in a private window (browsers cache 301 redirects aggressively). Then verify the source URL is entered correctly — check for extra spaces, missing slashes, or www vs. non-www mismatches. If you edited .htaccess, check for syntax errors and ensure mod_rewrite is enabled on your server. If you’re using Rank Math, enable Debug Redirections to see exactly what’s being triggered.
Redirecting URLs in WordPress Is Easier Than You Think
Setting up redirects in WordPress doesn’t have to be complicated. If you’re already running Rank Math, the built-in Redirection module is free, powerful, and handles everything from simple slug changes to complex wildcard patterns — no extra plugin needed. If you’re not on Rank Math yet, the Redirection plugin is a solid free alternative that works well for most sites.
The .htaccess method and PHP approach are there when you need direct server-level control — especially useful during large-scale migrations or complex permalink restructuring. Just always back up before editing server files.
The bottom line: every time you move, delete, or restructure a URL on your WordPress site, setting up a proper 301 redirect should be your first step. It protects your SEO, keeps your visitors happy, and ensures the work you’ve put into building your site doesn’t disappear overnight.
Need Help Fixing Redirects or SEO Issues?
If your site has broken links, traffic drops, or migration issues — I can help you fix them, recover lost traffic, and improve your rankings.