
Why “Last Updated” Dates Matter More Than You Think
If you update an old blog post, does anyone actually know? By default, WordPress and Divi only show the original publish date — not the last updated date. If you’re updating blog posts for SEO, this means both Google and your readers miss a key freshness signal.
I ran into this on a client site running Divi, where the blog module only pulls the original published date. Here’s the fix I built: a small snippet that adds a checkbox to the post editor, lets you optionally show a “Last Updated” date alongside the published date, and even lets you override that modified date with custom text when needed.
What This Snippet Does
Before we get into the code, here’s the behavior it adds to a standard WordPress + Divi setup:
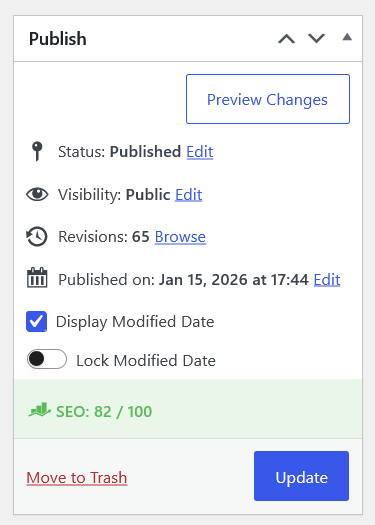
- Adds a “Display Modified Date” checkbox to the Publish box in the post editor
- When checked, shows both “Last Updated” and “Posted” dates on the frontend
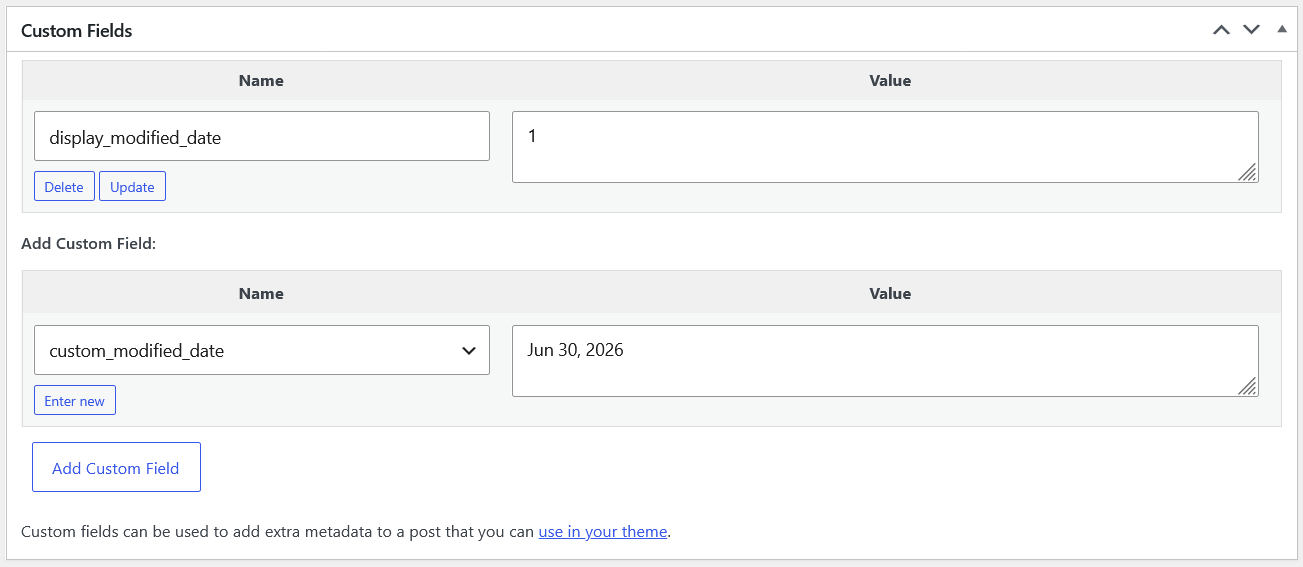
- Supports an optional custom modified date (useful if you want to show a specific date rather than WordPress’s auto-tracked modified timestamp)
- When unchecked, frontend behavior is untouched — just the normal published date
This hooks into Divi’s get_the_time filter specifically, so it’s built for sites using Divi’s blog module date output.
Not using Divi? The same checkbox-and-custom-field idea works on any theme — you’ll just swap the display logic for a shortcode instead of hooking into a Divi-specific filter. I’ve covered that version in Add a Custom Last Updated Date to Any WordPress Theme.
Prerequisites
You’ll need a way to add custom PHP snippets to your site. I use the free Code Snippets plugin rather than editing functions.php directly, since it’s easier to disable a broken snippet without FTP access if something goes wrong.
Step 1: Add the Checkbox to the Post Editor
This first function adds a checkbox in the Publish meta box of the post editor:
function add_custom_checkbox() {
    ?>
    <div class="misc-pub-section">
        <label><input type="checkbox" name="display_modified_date" id="display_modified_date" value="1" <?php checked(get_post_meta(get_the_ID(), 'display_modified_date', true), '1'); ?>> Display Modified Date</label>
    </div>
    <?php
}
add_action('post_submitbox_misc_actions', 'add_custom_checkbox');
Once this is active, you’ll see a new checkbox right in the Publish box when editing any post — no separate meta box, no extra clicks to find it.
Step 2: Save the Checkbox Value
This function saves your checkbox choice as post meta whenever you save or update the post:
function save_custom_checkbox_value( $post_id ) {
    if ( 'post' === get_post_type( $post_id ) ) {
        if ( isset( $_POST['display_modified_date'] ) ) {
            update_post_meta( $post_id, 'display_modified_date', '1' );
        } else {
            delete_post_meta( $post_id, 'display_modified_date' );
        }
    }
}
add_action( 'save_post', 'save_custom_checkbox_value' );
Note this only applies to the post post type. If you want this on pages or a custom post type, you’d adjust the type check accordingly.
Step 3: Control How the Date Displays on the Frontend
This is the part that actually changes what visitors see. It hooks into get_the_time, checks your checkbox setting, and optionally pulls in a custom modified date from a custom_modified_date meta field if you’ve set one:
function et_last_modified_date_blog( $time, $format, $post ) {
    if ( ! is_admin() && 'post' === $post->post_type ) {
        $display_modified_date = get_post_meta( $post->ID, 'display_modified_date', true );
        $custom_modified_date = get_post_meta( $post->ID, 'custom_modified_date', true );

        if ( $display_modified_date && ! empty( $custom_modified_date ) ) {
            $last_modified = sprintf( __( 'Last Updated: %s', 'Divi' ), esc_html( $custom_modified_date ) );
            $published = sprintf( __( 'Posted: %s', 'Divi' ), esc_html( get_post_time( $format, false, $post ) ) );
            $date = $last_modified . ' | ' . $published;
        } elseif ( $display_modified_date ) {
            $last_modified = sprintf( __( 'Last Updated: %s', 'Divi' ), esc_html( get_post_modified_time( $format, false, $post ) ) );
            $published = sprintf( __( 'Posted: %s', 'Divi' ), esc_html( get_post_time( $format, false, $post ) ) );
            $date = $last_modified . ' | ' . $published;
        } else {
            $date = sprintf( __( 'Posted: %s', 'Divi' ), esc_html( get_post_time( $format, false, $post ) ) );
        }

        return $date;
    }

    return $time;
}
add_filter( 'get_the_time', 'et_last_modified_date_blog', 10, 3 );
There are three possible outcomes here, depending on what’s set for a given post:
- Checkbox off: only the published date shows, exactly like default WordPress/Divi behavior
- Checkbox on, no custom date set: shows WordPress’s own tracked “modified” timestamp alongside the published date
- Checkbox on, custom date set: shows your custom text instead of the auto-tracked modified date

Step 4: Adding the Custom Modified Date (Optional)
The snippet above reads from a custom_modified_date custom field, but it doesn’t add a UI for it. You have two options:
- Use the classic Custom Fields panel in the editor to manually add a
custom_modified_datefield with your preferred text - Extend Step 1’s checkbox function with a text input field, saved the same way as Step 2
I’ve generally used the manual custom field route since it’s rare that I want to override the real modified date with something else — it’s more of an escape hatch than a feature I use on every post.
Why I Built This Instead of Using a Plugin
There are plugins that auto-display a “last updated” date, but most of them affect every post site-wide with no per-post control. I wanted the choice to live post-by-post — some older posts genuinely haven’t been touched and shouldn’t claim a fake “update,” while refreshed posts should get credit for the freshness signal, both for readers and for search engines.
This also complements structured data (like dateModified in schema), which search engines use alongside visible dates to understand content freshness.
Where to Add This Code
Paste the combined snippet into a new Code Snippets entry (or your child theme’s functions.php) and activate it. Test on a single post first by checking the box, saving, and viewing the post on the frontend before rolling it out further.
Want This Set Up Without the Trial and Error?
If you’re updating content for SEO but not seeing results, small technical tweaks like this can make a difference. I can help you implement and optimize them properly.
Frequently Asked Questions
Will this work on any WordPress theme, or only Divi?
This specific snippet hooks into Divi’s date output filter, so it’s built for Divi’s blog module. Other themes that don’t rely on the same filter would need the date display logic adjusted for their own template files.
Does this affect pages, or only blog posts?
As written, it only applies to the post post type. You can extend the post type checks in Steps 2 and 3 if you want the same behavior on pages or custom post types.
What happens if I check the box but never set a custom modified date?
WordPress’s own tracked “last modified” timestamp is used automatically — the one that updates whenever you save changes to the post.
Is this safe to use alongside caching plugins?
Yes, but if you use page or object caching, make sure to clear the cache for a post after toggling the checkbox or updating the custom date, or the frontend may keep showing the cached version.
Have questions about adapting this for your own setup?