If you have already read our guide on why websites show so much direct traffic in GA4, you know the causes. This article walks you through exactly how to fix direct traffic in GA4 — every fix, explained in full, with exact steps you can follow today.
We cover everything from UTM parameter setup and caching plugin configuration to cross-domain tracking, internal traffic filtering, and verifying your GA4 tag is actually firing on every page.
Work through the sections relevant to your setup and your direct traffic numbers will start making a lot more sense.
Quick Reference: Fixes by Cause
| Cause of High Direct Traffic | Fix |
|---|---|
| Missing UTM parameters on campaigns | Add UTM tags to all email, social, and ad links |
| UTM parameters getting stripped | Test tagged links end to end via DebugView and Redirect Path |
| Missing GA4 tag on some pages | Audit with Tag Assistant or DebugView, fix all untagged pages |
| Caching plugin breaking GA4 tag | Exclude GTM/GA4 script from JS delay in cache settings |
| HTTPS to HTTP redirect stripping referrer | Migrate to HTTPS and set up 301 redirects |
| Redirect chains losing attribution | Replace JS redirects with server-side 301 redirects |
| Cross-domain tracking not set up | Configure domains in GA4 Admin > Data Streams |
| Cookie consent causing new sessions | Configure CMP to avoid page refresh on accept |
| Internal team traffic inflating data | Define IP rules and activate internal traffic filter |
| Bot traffic showing as direct | Check engagement time, use Cloudflare bot protection |
Fix Tracking & Attribution at the Source
1. Add UTM Parameters to All Your Campaign Links
This is the most impactful single fix you can make. If your email newsletters, social media posts, paid ads, or QR codes are sending links without UTM parameters, GA4 has no way to identify those sessions. They end up in direct traffic.
UTM parameters are small tags you add to the end of a URL. They tell GA4 exactly where a visitor came from and which campaign sent them.
What a Properly Tagged URL Looks Like
An untagged link:
https://yourwebsite.com/blog/post-title
The same link with UTM parameters:
https://yourwebsite.com/blog/post-title?utm_source=newsletter&utm_medium=email&utm_campaign=march_2025
GA4 reads these tags and correctly categorises the session as Email traffic instead of Direct.
The Five UTM Parameters
| Parameter | Purpose | Example Value |
|---|---|---|
| utm_source | Where the traffic is coming from | newsletter, facebook, google |
| utm_medium | The type of channel | email, cpc, social |
| utm_campaign | The specific campaign name | march_2025, black_friday |
| utm_content | Differentiates links in the same campaign | header_link, footer_cta |
| utm_term | Used for paid search keywords | buy+running+shoes |
The first three (source, medium, campaign) are the most important and should be used on every campaign link without exception.
How to Build UTM Links
Step 1: Go to Google’s Campaign URL Builder
Visit Google’s free URL Builder tool for building properly formatted UTM links.
Step 2: Fill in Your Website URL
Enter the exact destination URL where you want to send traffic.
Step 3: Add Source, Medium, and Campaign
Fill in the utm_source, utm_medium, and utm_campaign fields. Keep them lowercase and use underscores instead of spaces.
Step 4: Copy the Generated URL
The tool builds the full tagged URL at the bottom. Copy it and use this link in your email, post, or ad instead of the plain URL.
Step 5: Shorten If Needed
If the URL looks too long for a social post, run it through Bitly or a similar shortener after adding the UTM tags, not before.
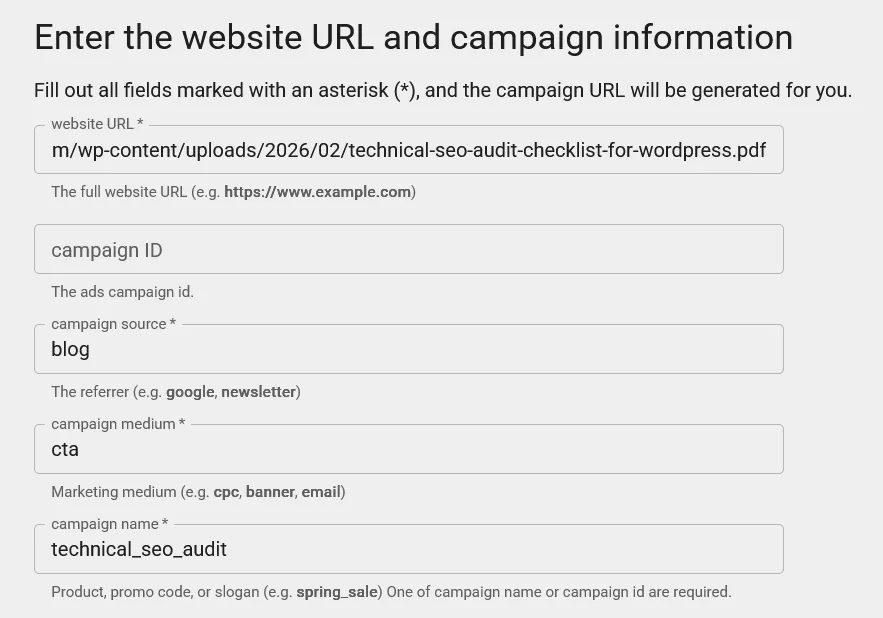
Google Campaign URL Builder tool with filled fields
Tip: Build a UTM naming convention and stick to it. If one campaign uses utm_medium=email and another uses utm_medium=Email (capital E), GA4 treats them as two different sources. Keep everything lowercase and consistent.
Where to Use UTM Parameters
- Every link in your email newsletters and transactional emails
- Every social media post linking to your website
- All paid advertising links (Google Ads, Meta, LinkedIn, etc.)
- QR codes — add UTM tags before generating the QR code
- Links embedded in PDF guides and downloadable documents
- Links in your email signature if they drive meaningful traffic
Note: Never use UTM parameters on internal links within your own website. GA4 will treat each tagged internal click as a new session and reset attribution, which makes your data worse, not better.
2. Verify UTM Parameters Are Not Being Stripped
Sometimes marketers add UTM parameters correctly but they get stripped before GA4 can read them. This can happen in several ways:
- Some email clients remove query parameters from links for privacy or security reasons
- Redirect chains can drop UTM parameters if the redirect does not preserve the query string
- Some JavaScript redirects rewrite the URL and remove tracking parameters
- Landing pages that use JavaScript-based routing (like React or Vue single-page apps) can sometimes fail to pass UTM parameters to GA4 correctly
How to Check
Step 1: Send Yourself a Test Email
Send your email newsletter to your own address with a tagged link. Click the link and check the URL in your browser bar after the page loads. The UTM parameters should still be visible in the URL.
Step 2: Check GA4 DebugView
With GA Debugger active, click your tagged link and watch DebugView in GA4. You should see a session start event with the correct campaign source and medium. If you see a direct session instead, the parameters were dropped.
Step 3: Test Redirect Paths
Use the Redirect Path extension to follow any URL that passes through redirects. Verify that utm_source and utm_medium are still present in the final URL after all redirects complete.
Fix Your GA4 Tag Setup to Reduce Direct Traffic
1. Audit and Fix Your GA4 Tag Coverage
If your GA4 tag is missing from certain pages, sessions that start on those pages get lost. When the user eventually reaches a tagged page, GA4 starts a fresh session with no source data, contributing to your direct traffic count.
The most common pages where the tag goes missing:
- Checkout pages built on external platforms
- Thank you and confirmation pages
- Landing pages created with page builders like Elementor or Divi
- Pages added recently that were not covered by a tag template
- AMP pages, if you have them
Method 1: Use Google Tag Assistant
Step 1: Install Google Tag Assistant
Install the Tag Assistant Legacy or Tag Assistant Companion Chrome extension from the Chrome Web Store.
Step 2: Enable Recording
Open Tag Assistant, click Enable, and then browse through your website including your homepage, a blog post, a product page, your checkout page, and your thank you page.
Step 3: Review Tag Status on Each Page
Tag Assistant shows a green, yellow, or red indicator for each page. A missing GA4 tag will show no GA4 entry at all, or a red error. Any page without a green GA4 tag needs to be investigated.
Method 2: Use GA4 DebugView
Step 1: Install the GA Debugger Chrome Extension
Install Google Analytics Debugger from the Chrome Web Store. Once enabled, it forces GA4 into debug mode in your browser.
Step 2: Open GA4 DebugView
In GA4, go to Admin > DebugView. This shows live events being fired from your browser in real time.
Step 3: Browse Your Website
Navigate through the pages you want to check. Each page view should appear in DebugView within a few seconds. If a page shows no activity, the tag is not firing on that page.
Tip: You can also check quickly in any browser by opening the developer console (right-click > Inspect > Console) and typing document.referrer. If it returns an empty string on a key landing page, the referrer is not being passed and the source may be getting lost.
Fixing Missing Tags
How you fix a missing tag depends on how your GA4 is installed:
- Using Google Tag Manager: Open GTM and check that your GA4 Configuration tag is set to fire on All Pages. If certain pages are excluded or the trigger is misconfigured, adjust it and republish the container.
- Using direct gtag.js code: Check that the GA4 snippet is present in the head section of every page template, including custom landing page templates and checkout templates.
- Using a WordPress plugin like Site Kit: Check that Site Kit is active and that any manually created page templates include the plugin’s hook for inserting the tracking code.
2. Stop Caching Plugins From Breaking Your GA4 Tag
This is one of the most common causes of GA4 tracking problems on WordPress websites, and it is one that rarely gets mentioned. When a caching plugin delays or minifies JavaScript files, it can prevent your GA4 tag from loading correctly. The result is missed sessions or sessions with no source data showing up as direct traffic in GA4.
The specific issue to watch for is JavaScript delay or JavaScript defer — features found in most caching plugins that are designed to improve page speed. When these are applied to your Google Tag Manager container script or GA4 tag, tracking breaks.
WP Rocket
WP Rocket is one of the most popular WordPress caching plugins and has a JavaScript delay feature that can interfere with GA4.
Step 1: Open WP Rocket Settings
In your WordPress dashboard, go to Settings > WP Rocket.
Step 2: Go to the File Optimization Tab
Click on File Optimization in the WP Rocket menu.
Step 3: Find Delay JavaScript Execution
Scroll down to the JavaScript section. If Delay JavaScript Execution is enabled, you need to add an exclusion.
Step 4: Add Your GTM or GA4 Script to the Exclusion List
In the Excluded JavaScript field, add the following depending on how your GA4 is installed:
- If using Google Tag Manager: add /gtm.js
- If using direct GA4 tag (gtag.js): add /gtag/js
- You can also add googletagmanager.com to exclude the entire domain
Step 5: Save Changes
Click Save Changes and clear your WP Rocket cache by clicking the Clear Cache button in the top WordPress admin bar.
Tip: If you are not sure whether the issue is WP Rocket, temporarily add ?nowprocket to any page URL on your site. This bypasses WP Rocket entirely. If GA4 starts tracking correctly, WP Rocket is the cause.
LiteSpeed Cache
LiteSpeed Cache is the most popular free caching plugin, particularly on LiteSpeed-hosted servers. Its JS Defer and JS Delay features can both interfere with GA4 tracking.
Step 1: Open LiteSpeed Cache Settings
In your WordPress dashboard, go to LiteSpeed Cache > Page Optimization.
Step 2: Go to the JS Settings Tab
Click on the JS tab within Page Optimization settings.
Step 3: Find JS Deferred or JS Delayed
If either of these options is enabled, you need to add exclusions.
Step 4: Add Exclusions in the Tuning Tab
Click on the Tuning tab. In the JS Excludes field (for minification exclusions) or the JS Delayed Inline Script Excludes field, add the following:
- For GTM: googletagmanager.com
- For direct GA4: google-analytics.com and googletagservices.com
Step 5: Save and Clear Cache
Click Save and then purge your LiteSpeed Cache by going to LiteSpeed Cache > Manage > Purge All.
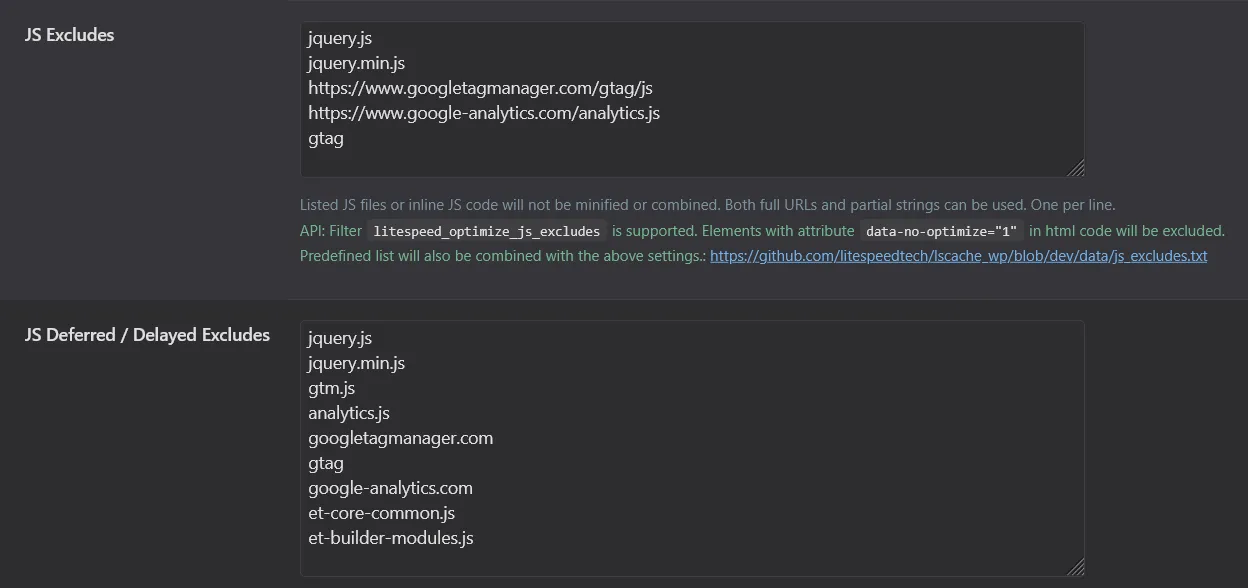
LiteSpeed Cache Tuning tab showing JS Excludes field with GTM domain added
Note: LiteSpeed Cache is also commonly used on QUIC.cloud CDN setups. If you use QUIC.cloud as well, check that CDN-level caching is not serving stale versions of your tracking scripts.
W3 Total Cache
Step 1: Open W3 Total Cache Settings
In WordPress, go to Performance > General Settings.
Step 2: Locate Minify Settings
Scroll down to the Minify section. If JS minification is enabled, you need to exclude your tracking scripts.
Step 3: Open Minify Settings Detail
Go to Performance > Minify. Look for the JS file exclusion area.
Step 4: Add GTM or GA4 to Exclusions
Add googletagmanager.com and/or google-analytics.com to the exclusion list so these scripts are never minified or deferred.
Step 5: Save and Purge Cache
Click Save Settings and then empty all caches from the Performance > Dashboard area.
Tip: W3 Total Cache is known for being complex to configure. If you are not comfortable with the settings, consider switching to WP Rocket or LiteSpeed Cache, both of which are easier to manage correctly.
WP Super Cache
WP Super Cache is a simpler plugin and is less likely to cause GTM or GA4 issues than the others, since it does not have JavaScript delay features. However, if you are seeing GA4 issues on a site that uses WP Super Cache, check the following:
Step 1: Go to WP Super Cache Settings
In WordPress, go to Settings > WP Super Cache.
Step 2: Check the Advanced Tab
Click on the Advanced tab and look for any JavaScript-related optimisation options.
Step 3: Verify Cache Preload Settings
Under the Preload tab, ensure preloading is not creating cached pages that bypass your tag manager setup.
Tip: If your site uses WP Super Cache alongside a separate JavaScript optimisation plugin like Autoptimize, the issue is more likely coming from Autoptimize. Add googletagmanager to its exclusion list.
Cloudflare as a CDN (Not a Plugin)
If you use Cloudflare in front of your website with HTML caching or Rocket Loader enabled, it can also delay or break your GA4 tracking scripts.
Step 1: Log Into Your Cloudflare Dashboard
Go to cloudflare.com and select your domain.
Step 2: Go to Speed > Optimization
Navigate to the Speed section and click on Optimization.
Step 3: Check Rocket Loader
If Rocket Loader is enabled, it defers JavaScript loading to improve performance. This can delay GA4 from firing. Either disable it entirely or scroll down to find the option to exclude specific scripts.
Step 4: Add data-cfasync Attribute as an Alternative
If you manage your own server, you can add data-cfasync=”false” to your GTM script tag to tell Cloudflare to skip Rocket Loader for that specific script. This requires editing your theme’s header file or using a plugin like Insert Headers and Footers.
Fix Your Website & Redirect Issues
1. Make Sure Your Entire Website Is on HTTPS
This is a foundational fix that affects more than just GA4, but it directly impacts direct traffic attribution.
When a user arrives on an HTTP page from a link on an HTTPS website, the browser intentionally drops the referrer header for security reasons. GA4 receives no source information and records the session as direct traffic.
This means that any page on your site still running on HTTP is potentially receiving traffic from external links that should be attributed to referral, organic, or social — but is instead appearing as direct.
How to Check
Step 1: Type Your Website URL
Open your browser and type your domain with http:// at the start, for example http://yourwebsite.com. If it immediately redirects to https://, your main domain is covered.
Step 2: Check Individual Pages
Occasionally a subdomain, a subdirectory, or a legacy landing page is still on HTTP. Look in your browser bar at the lock icon. If you see a Not Secure warning, that page is on HTTP.
Step 3: Run a Site Audit
Use a tool like Screaming Frog, Ahrefs, or Google Search Console to crawl your site and identify any pages still served over HTTP.
How to Fix
If your site is not on HTTPS, contact your hosting provider. Most hosts including SiteGround, Hostinger, WP Engine, Cloudflare, and others provide free SSL certificates through Let’s Encrypt. Installation usually takes just a few minutes.
Once SSL is installed, make sure you have a permanent 301 redirect in place from all HTTP URLs to their HTTPS equivalents. Without this, some users may still land on HTTP pages and lose their referral attribution.
Tip: Also check that all internal links on your website use https:// not http://. Mixed content can cause issues even after SSL is installed.
2. Fix Redirect Chains That Strip Attribution
When a user clicks a link and passes through multiple redirects before landing on your page, the referrer information can get lost along the way. GA4 then records the session as direct because by the time the user arrives, there is no source data remaining.
Common situations where redirect chains cause this:
- Old URLs that redirect to new URLs through several intermediate steps
- Links in marketing materials pointing to shortened or vanity URLs that then redirect
- JavaScript redirects or meta refresh redirects, which are particularly bad at preserving referrer data
- Affiliate or tracking links that pass through multiple redirect hops
How to Identify Redirect Chains
Step 1: Install the Redirect Path Chrome Extension
Search for Redirect Path in the Chrome Web Store and install it. This extension shows you every redirect step a URL goes through before the final destination.
Step 2: Test Your Key URLs
Click any link that you suspect may be going through redirects — for example, your newsletter CTAs, old blog posts that have been moved, or any vanity URLs you use in campaigns.
Step 3: Look for Client-Side Redirects
Redirect Path highlights JavaScript and meta refresh redirects in orange or red. These are the most likely to strip referrer data and cause direct traffic attribution.
How to Fix
The goal is to reduce every redirect chain to a single 301 server-side redirect from the original URL to the final destination. Avoid JavaScript window.location redirects and meta refresh tags wherever possible — neither preserves referrer data reliably.
- Update old links in your content, emails, and campaigns to point directly to the current URL
- Replace JavaScript redirects with server-side 301 redirects through your .htaccess file or hosting control panel
- If you use UTM parameters on links that go through redirects, verify the parameters survive the redirect by checking the final URL
Fix Cross-Domain & Session Tracking
1. Set Up Cross-Domain Tracking in GA4
If your website spans more than one domain, and you have not configured cross-domain tracking, GA4 treats each domain as a completely separate website. When a user moves from one domain to another, their original session source gets lost and the second session appears as direct traffic.
This applies to common setups like:
- Main site on yourdomain.com and checkout on shop.yourdomain.com or a completely different domain
- Blog on blog.yourdomain.com and the main site on yourdomain.com
- Landing pages hosted on a separate domain like a page builder or third-party tool
How to Configure Cross-Domain Tracking in GA4
Tip: You need Editor or Administrator access to the GA4 property to make these changes.
Step 1: Open GA4 Admin
In GA4, click the Admin gear icon in the lower-left corner.
Step 2: Go to Data Streams
Under the Property column, click Data Streams. Select your web data stream.
Step 3: Open Configure Tag Settings
Scroll to the bottom of the web stream details page and click Configure tag settings.
Step 4: Click Configure Your Domains
In the Settings section, find and click Configure your domains.
Step 5: Add Your Domains
Click Add condition. Set the match type to Contains and enter each domain you want to include in cross-domain tracking, for example:
- yourdomain.com
- shop.yourdomain.com
- checkoutplatform.com (if applicable)
Step 6: Save Your Changes
Click Save. GA4 will now pass a _gl parameter in URLs when users move between your listed domains, keeping the session and source attribution intact.
How to Verify Cross-Domain Tracking Is Working
Step 1: Browse Your Site in Incognito Mode
Open an incognito window and navigate from one of your domains to another by clicking a link.
Step 2: Check the URL on the Second Domain
After clicking the link, look at the URL in your browser bar. If cross-domain tracking is working, you will see a _gl= parameter appended to the URL. For example:
https://shop.yourdomain.com/product?_gl=1*abc123*...
Step 3: Check GA4 Realtime Report
Open GA4 in another tab and go to Reports > Realtime. You should see only one active user session, not two separate sessions as you move between domains.
Note: Cross-domain tracking only works for standard link clicks. If your checkout uses a form submission or JavaScript redirect to move users between domains, the _gl parameter may not be passed automatically. In that case, speak with a developer about a custom solution.
2. Fix Cookie Consent Banner Issues
A poorly configured cookie consent banner can generate a surprising amount of fake direct traffic in GA4. Two specific problems are responsible for most of the damage.
Problem 1: Users Click Away Before Accepting
If your cookie banner is subtle or slow to appear, a user might click a link to another page before they have interacted with the banner. The second page has no memory of the original referral data, so that session gets recorded as direct.
The fix: Make your consent banner prominent enough that users interact with it before navigating. Many consent management platforms (CMPs) offer an option to block navigation until the user has made a choice. This is not the most user-friendly approach, but it prevents attribution data from being lost on the first page.
Problem 2: Accept Button Triggers a Page Refresh
Some consent platforms refresh the entire page when a user clicks Accept. This page refresh creates a brand new session in GA4 — and the original referral source from the first session is gone. Everything from that point is recorded as direct.
The fix: Check your CMP settings for a page reload on consent option and disable it. If you are using a custom implementation, make sure the consent callback fires GA4 without refreshing the page.
Tip: Popular CMPs like Cookiebot, OneTrust, and Complianz all have documentation on configuring them to work correctly with GA4 and GTM. If you are unsure, their support teams can help you verify the setup.
Filter Out Unwanted Traffic
1. Exclude Internal Traffic From GA4 Reports
Your own team visiting your website every day adds up. Developers testing pages, writers checking published articles, and managers reviewing the site all generate sessions that look like real user traffic — and most of it inflates your direct traffic in GA4 because your team is likely typing URLs directly or using bookmarks.
Here is how to filter it out properly.
Step 1: Find Your IP Address
On the device you want to exclude, open a browser and search what is my IP address. Google shows it at the top of the results. Write it down. If you have an office network, ask your IT team for the office public IP address.
Note: Many home broadband connections use dynamic IP addresses that change periodically. If your team works remotely, IP-based filtering may not catch all internal traffic. In that case, see the Chrome extension method below.
Step 2: Define Internal Traffic in GA4
- Open GA4 Admin
Click the Admin gear icon in the lower-left. - Go to Data Streams
Under Property, click Data Streams and select your web stream. - Open Configure Tag Settings
Scroll down and click Configure tag settings. - Click Define Internal Traffic
Click Show all if you do not see it immediately. Then click Define internal traffic. - Create a New Rule
Click Create. Give the rule a name like Office IP or My Home IP. - Set the Match Type and Enter Your IP
Under IP address, set the match type to IP address equals, then enter your IP address in the Value field. Add additional IPs if you need to cover multiple locations. - Save the Rule
Click Create to save.
GA4 Define Internal Traffic screen showing IP address rule being created
Step 3: Activate the Internal Traffic Filter
Defining the IP addresses alone is not enough. You need to activate the data filter to actually remove internal traffic from your reports.
- Go Back to GA4 Admin
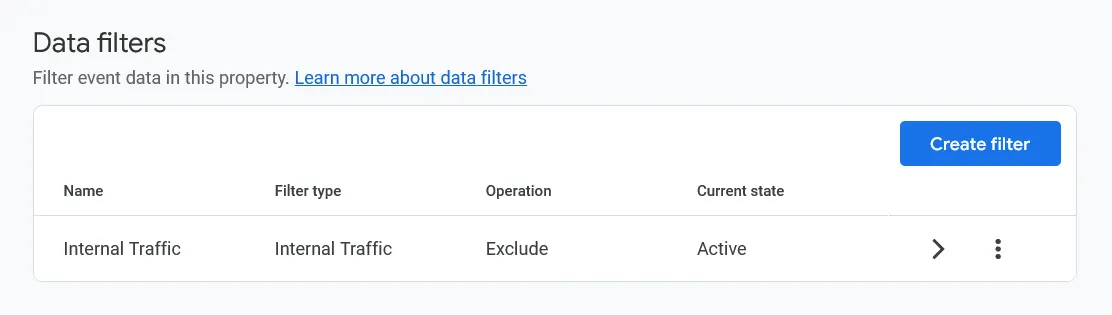
Click the Admin gear icon. - Click Data Filters
Under Data collection and modification, click Data filters. You will see a pre-existing filter called Internal Traffic with a status of Testing. - Edit the Filter
Click on Internal Traffic to open it. - Change Status to Active
Change the filter state from Testing to Active and save.
Note: GA4 filters can take 24 to 48 hours to fully take effect. They also only apply to new data going forward — they do not remove historical internal traffic that has already been recorded.
Alternative: Chrome Extension for Dynamic IPs
If your IP address changes frequently or your team works from multiple locations, a browser extension is more reliable than IP filtering.
- Google Analytics Opt-out Add-on: Google’s official extension. When enabled, it stops GA4 from tracking in that browser entirely. Simple and reliable but affects all sites, not just yours.
- Internal Traffic Excluder for GA4: A newer extension that uses a cookie to mark your traffic as internal. More targeted than the Google opt-out tool.
Both are available in the Chrome Web Store.
2. Reduce Bot Traffic Showing as Direct
GA4 filters many known bots automatically. But not all of them get caught, and automated crawlers that trigger your GA4 tag will appear as direct traffic in reports since they provide no referral information.
If you want to see what this looks like in practice, read how I identified and fixed bot traffic in GA4 that was silently affecting a client’s AdSense revenue.
The most effective way to identify and address bot traffic in GA4:
Step 1: Check Engagement Metrics for Direct Traffic
Go to Reports > Acquisition > Traffic Acquisition
Filter the report to show only Direct sessions.
Add the Engagement Time Dimension
Look at average engagement time per session for direct traffic. Real users typically have engagement times of 30 seconds or more. Sessions with 0 seconds engagement time are strong candidates for bot traffic.
Check Landing Pages
Add landing page as a secondary dimension. Direct traffic landing on long, specific blog post URLs that no one would type manually is a red flag for bots or crawlers.
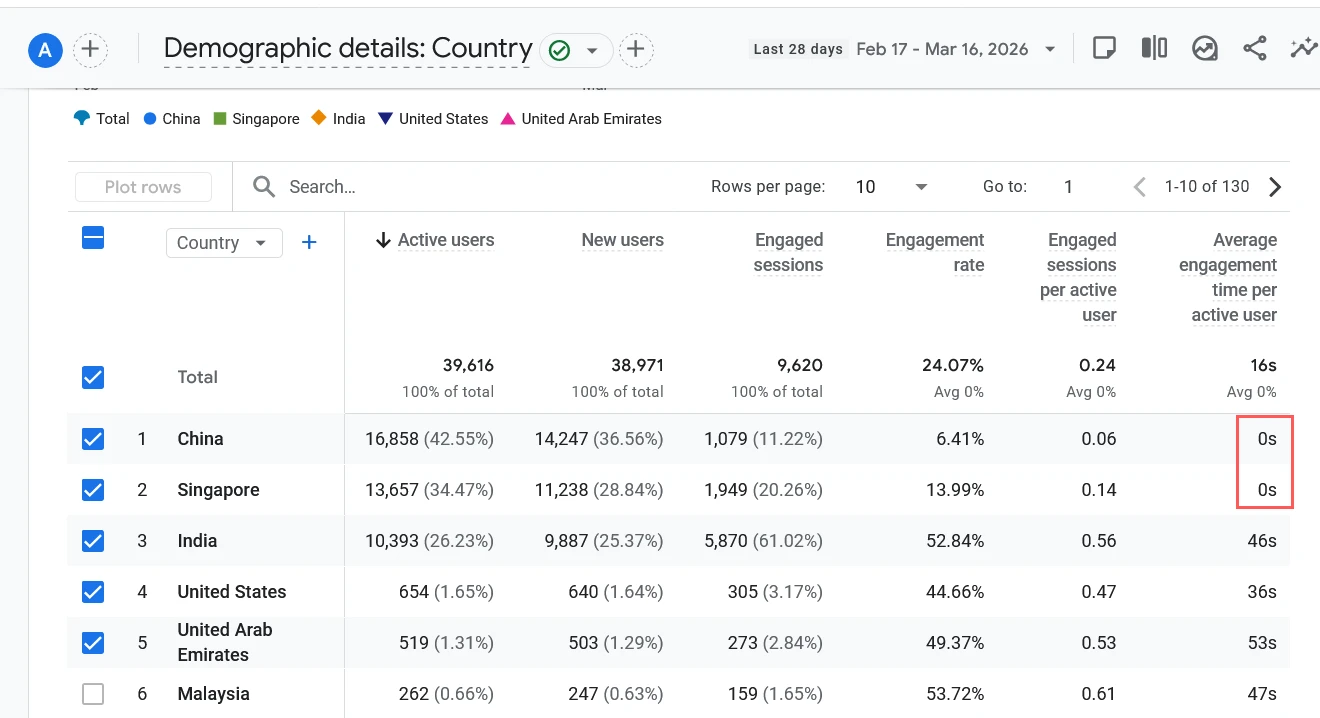
GA4 Traffic Acquisition report filtered to Direct, showing landing pages and 0s engagement time
Step 2: Use Cloudflare Bot Protection
If you find that a significant portion of your direct traffic appears to be automated, Cloudflare is one of the most effective tools for filtering it at the network level before it ever reaches your website.
Set Up Cloudflare
If your site is not already behind Cloudflare, create a free account at cloudflare.com and follow the instructions to point your domain’s nameservers to Cloudflare.
Enable Bot Fight Mode
In your Cloudflare dashboard, go to Security > Bots. Enable Bot Fight Mode. On the free plan, this blocks the most common automated traffic. Pro and Business plans include a Super Bot Fight Mode with more granular controls.
Review the Firewall Analytics
After a few days, check Cloudflare’s Security > Analytics section. You will see how many requests are being identified and blocked as bots. This gives you a clear picture of how much of your traffic was automated.
Monitor GA4 After Enabling
Over the following week, compare your GA4 direct traffic volume and engagement metrics. You should see the direct traffic count drop and the average engagement time for remaining sessions increase, indicating the remaining traffic is more likely to be real users.

Cloudflare Security > Bots screen with Bot Fight Mode enabled
Tip: After enabling Cloudflare bot protection, your total session count in GA4 may drop noticeably. This can feel alarming but it is a positive sign — your remaining data is more accurate and represents real visitors.
Your GA4 Direct Traffic Fix Checklist
Work through this checklist every quarter to keep your GA4 attribution accurate:
| Fix | How to Check | Priority |
| UTM parameters on all campaigns | Review last 3 email and social campaigns | High |
| Caching plugin not delaying GA4 tag | Test with ?nowprocket or equivalent bypass | High |
| GA4 tag on all pages | Audit with Tag Assistant or DebugView | High |
| Cross-domain tracking configured | Check for _gl parameter when crossing domains | High if multi-domain |
| Internal traffic filtered | Check Data Filters > Internal Traffic is Active | Medium |
| Site fully on HTTPS | Check for Not Secure warnings in browser | High |
| No redirect chains breaking referrer | Test key URLs with Redirect Path extension | Medium |
| Cookie consent not causing page refresh | Check CMP settings for reload on accept | Medium |
| Bot traffic check | Review direct sessions with 0s engagement time | Medium |
| UTM parameters surviving redirects | Test tagged links end to end | Medium |
FAQ
1. How long does it take to see improvement in GA4 after fixing these issues?
Most fixes like adding UTM parameters or fixing your GA4 tag take effect immediately. Cross-domain tracking changes are typically visible within a day. Internal traffic filters take 24 to 48 hours to activate and only apply to new data going forward.
2. Will fixing direct traffic in GA4 lower my total session count?
Not necessarily. UTM fixes and cross-domain tracking changes will reclassify existing traffic to the correct channel, so overall sessions stay the same. Bot filtering can reduce total sessions, but that is a positive result — you are removing fake traffic, not losing real visitors.
3. Do I need Google Tag Manager to fix these issues?
No, most of these fixes can be done directly in GA4 Admin or by editing your website settings. GTM makes tag management easier and is recommended for larger sites, but it is not required to implement any of the fixes in this guide.
4. My direct traffic is still high after all these fixes. What next?
If you still can’t fully fix direct traffic in GA4 after working through this checklist, the remaining direct traffic is likely a mix of genuinely direct visits (loyal users, bookmarks), dark social (links shared in private messaging apps), and mobile app traffic — all of which are difficult or impossible to attribute. At that point, the data is as clean as it can practically be.
If your traffic looks clean in GA4 but you are still not seeing enquiries or conversions, the problem may be elsewhere — read our guide on why your website gets traffic but no leads to work through that next.
5. Should I worry if direct traffic is around 20 percent?
No. Up to 20 to 25 percent direct traffic is a normal range for most websites. The fixes in this guide are most important when direct traffic is unusually high, when it contains a large proportion of zero-engagement sessions, or when it is clearly landing on deep URLs that real users would not type manually.