You click Add Media, choose your image, and — nothing. Or worse, you get a vague error message with no real explanation.
If WordPress images are not uploading, the problem is usually related to file permissions, PHP memory limits, upload size restrictions, or plugin conflicts.
You may see errors like:
- “HTTP error”
- “Has failed to upload”
- images disappearing after upload
- uploads getting stuck at 100%
This step-by-step guide explains how to fix WordPress images not uploading, starting with the most common causes first.
If you are on Hostinger with a LiteSpeed server, a few of these fixes will be specific to your setup.
Quick Reference: WordPress Image Upload Errors and Fixes
| Error / Symptom | Most Likely Cause | Fix |
|---|---|---|
| Upload fails silently | File size over limit | Increase upload limit |
| “Has Failed to Upload” | Wrong file permissions | Fix via File Manager |
| HTTP error on upload | Memory limit too low | Increase PHP memory |
| Only some images fail | Wrong file type or file name | Check file name and allowed types |
| Upload works, image missing | Wrong uploads folder permissions | Fix uploads folder |
| Error after WordPress update | .htaccess corruption | Regenerate .htaccess |
Why WordPress Images Fail to Upload
WordPress uploads images to /wp-content/uploads/. For that to work, your server needs:
- Enough memory to process the file
- Correct permissions on the uploads folder
- A file size within the allowed limit
- The correct file type
When any one of these is wrong, the upload fails — sometimes with a clear error, sometimes silently.
How to Fix WordPress Images Not Uploading
Most WordPress image upload errors come from one of four things:
- Upload size limits
- File permission problems
- PHP memory restrictions
- Plugin or server conflicts
The easiest way to fix the issue is to start with the most common causes first, then move to the more advanced fixes only if needed.
Before You Start
Before changing permissions or PHP settings:
- Clear your browser cache
- Try uploading a smaller image
- Test with JPG or PNG first
- Disable browser extensions temporarily
This reduces panic-driven fixes.
Follow the steps below in order — most upload issues are resolved within the first few fixes.
Fix 1: Check the File Size Limit
This is the most common cause. WordPress has a default upload limit, and your host sets a separate server-side limit. The lower one wins.
How to Check Your Current Limit
Go to Media → Add New in your WordPress dashboard. At the bottom of the upload area, you will see a line like:
Maximum upload file size: 32 MB
If your image is larger than that, it will fail.
How to Increase the Upload Limit on Hostinger
- Log in to hPanel
- Go to Hosting → Manage → PHP Configuration
- Set
upload_max_filesizeandpost_max_sizeto your preferred limit (64M or 128M is reasonable) - Save changes
Alternatively, add this to your php.ini file or .htaccess:
php_value upload_max_filesize 64M
php_value post_max_size 64M
php_value memory_limit 256M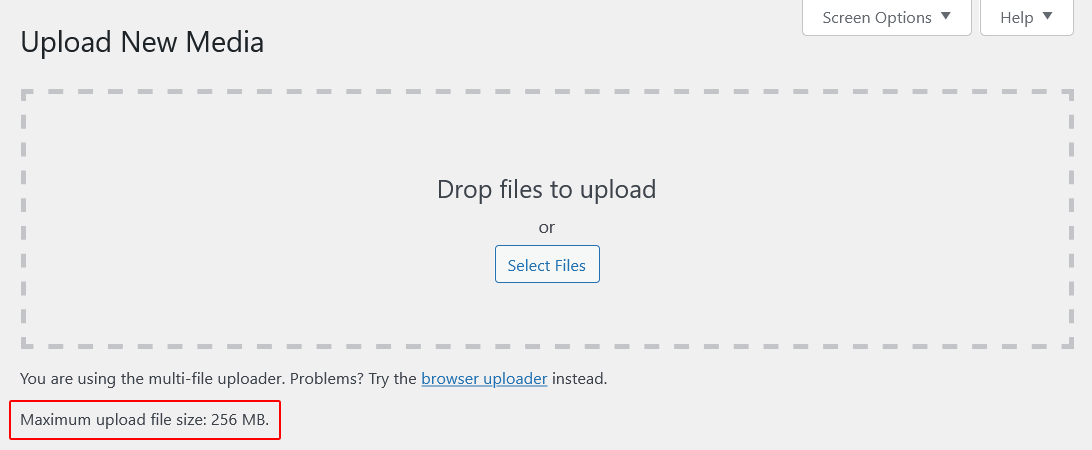
Fix 2: Fix File Permissions on the Uploads Folder
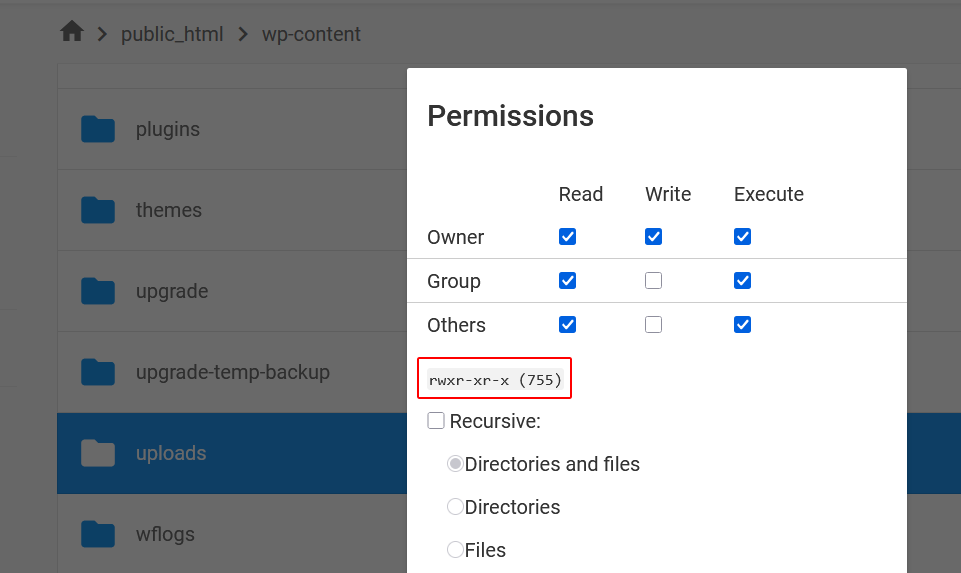
WordPress needs write access to /wp-content/uploads/. If the permissions are wrong, uploads fail — sometimes without a clear error message.
Correct Permissions
- Folders: 755
- Files: 644
How to Fix on Hostinger
- Log in to hPanel → File Manager
- Navigate to
public_html/wp-content/uploads/ - Right-click the
uploadsfolder → Change Permissions - Set to 755
- Check the box to apply to all subfolders and files (set files to 644)
If you prefer FTP, use FileZilla. Connect, navigate to the same path, right-click the folder, and set permissions the same way.
Note: Never set folders to 777. It works, but it is a serious security risk. Stick with 755.
Fix 3: Increase the PHP Memory Limit
If you see an HTTP error during upload, a low PHP memory limit is often the cause. WordPress needs enough memory to process the image, generate thumbnails, and write the file.
Add this to your wp-config.php file, just above the line that says /* That's all, stop editing! */:
define('WP_MEMORY_LIMIT', '256M');On Hostinger, you can also change this from hPanel → PHP Configuration → memory_limit.
Fix 4: Rename the Uploads Folder (Permissions Reset Trick)
If the permissions fix above did not work, try this:
- In File Manager, rename
uploadstouploads_old - Create a new folder called
uploads - Set permissions on the new folder to 755
- Go to Settings → Media in WordPress and click Save Changes — this regenerates the folder structure
- Move your files from
uploads_oldback touploads
This forces WordPress to recreate the correct folder structure with proper ownership.
Fix 5: Check the Image File Name
WordPress can reject images with special characters in the file name — spaces, brackets, accented characters, or symbols.
Before uploading, rename the file to use only:
- Lowercase letters
- Numbers
- Hyphens
Bad: My Photo (Final) — v2.jpg
Good: my-photo-final-v2.jpg
This also helps with SEO — descriptive, hyphenated file names are easier for Google to read.
Fix 6: Regenerate the .htaccess File
A corrupted .htaccess file can block uploads without any clear error. This sometimes happens after a WordPress update or plugin change.
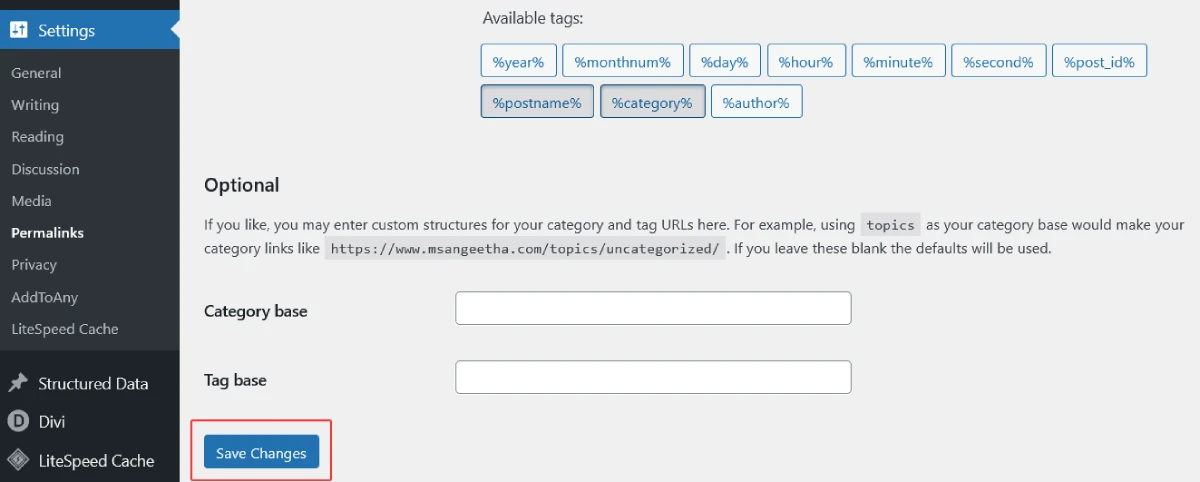
To Regenerate It
- Go to Settings → Permalinks in your WordPress dashboard
- Click Save Changes — do not change anything, just save
WordPress will rewrite the .htaccess file automatically. Try your upload again.
If the problem persists:
- Go to File Manager and find
.htaccessin your root folder - Rename it to
.htaccess_old - Go to Settings → Permalinks → Save Changes to generate a fresh one
Fix 7: Disable Plugins Temporarily
A security plugin, image optimisation plugin, or firewall can sometimes block uploads.
- Go to Plugins → Installed Plugins
- Deactivate all plugins
- Try uploading an image
- If it works, reactivate plugins one at a time to find the culprit
Common plugins known to interfere with uploads: WordFence, iThemes Security, and some image compression plugins.
Fix 8: Switch to the Default Theme Temporarily
Rarely, a theme can conflict with the media uploader. To rule this out:
- Go to Appearance → Themes
- Activate Twenty Twenty-Four or any default WordPress theme
- Try uploading again
If it works with the default theme, the issue is in your active theme’s code.
Fix 9: Check Your Browser
The WordPress media uploader uses JavaScript. If your browser has a strict extension, ad blocker, or outdated cache, it can interfere.
Try:
- Uploading in an incognito window
- Switching to a different browser (Chrome → Firefox, or vice versa)
- Clearing browser cache and cookies
This is not a server fix, but it rules out a surprisingly common cause.
Fix 10: Upload via FTP or File Manager Directly
If nothing else is working and you just need to get images on your site, upload them directly:
- Use FileZilla or Hostinger’s File Manager
- Navigate to
public_html/wp-content/uploads/YYYY/MM/ - Upload the image directly into the correct month folder
The image will not appear in your Media Library automatically, but you can use a plugin like Add From Server or Media from FTP to import it.
Specific Error Messages and What They Mean
“The uploaded file exceeds the upload_max_filesize directive”
Your image is larger than the server’s upload limit. See Fix 1.
“HTTP error”
Usually a memory or timeout issue. See Fix 3. Also try a smaller image to confirm.
“Has failed to upload due to an error”
Vague, but usually a permissions or
.htaccessissue. See Fix 2 and Fix 6.
Upload bar reaches 100% then disappears
Often a PHP timeout or memory issue. Try increasing
max_execution_timein PHP settings to 120 seconds.
“Sorry, this file type is not permitted for security reasons”
WordPress does not allow all file types by default. SVG files, for example, are blocked. You need a plugin like Safe SVG to enable them.
How to Allow SVG Uploads in WordPress
WordPress blocks SVG by default because SVGs can contain malicious code.
If you need SVGs for logos or icons, install the Safe SVG plugin. It sanitises SVG files on upload, making them safe to use.
Do not use code snippets from random forums to enable SVG — they bypass security without the sanitisation step.
Preventing Upload Issues Before They Happen
- Compress images before uploading – Use tools like Squoosh or ShortPixel to reduce file size without visible quality loss. Aim for under 200KB for most images.
- Use descriptive file names – Lowercase, hyphens only, no special characters.
- Keep PHP and WordPress updated – Outdated versions cause unexpected conflicts.
- Monitor your disk space – If your hosting account is full, uploads will fail silently. On Hostinger, check disk usage from hPanel → Overview.
Frequently Asked Questions
Why does my image upload fail with no error message?
WordPress image uploads usually fail silently because of incorrect file permissions, low PHP memory, or upload size restrictions. Start with Fix 1 and Fix 2.
Can I upload images larger than 64MB to WordPress?
Technically yes, if you increase the server limits. But for web use, you should never need to. Compress your images before uploading — 64MB is enormous for a web image.
Why do some images upload fine but others fail?
Usually a file size issue where larger images hit the limit, a file name issue with special characters, or a file type that WordPress blocks by default.
Does this affect Divi’s image upload too?
Yes. Divi uses the same WordPress media library. If the media library upload is broken, Divi’s image picker will fail too.
Will fixing file permissions break anything else on my site?
No, as long as you use the correct values — 755 for folders and 644 for files. These are the standard WordPress-recommended permissions.
Also Read
WordPress Images Still Not Uploading?
If you have tried every fix above and uploads are still failing, the issue is likely at the server level — something your host needs to look at directly.
Contact Hostinger support with the exact error message you see, the image file size, and the steps you have already tried. They can check server logs and confirm whether a server-side setting is blocking the upload.
For more WordPress troubleshooting help, start with my Common WordPress Errors guide — it covers the most frequent issues site owners run into, with step-by-step fixes.