If you’ve already bought a domain and hosting, the next step to launching your website is WordPress installation. This is the stage where your website actually comes to life — and the good news is, you don’t need any technical skills to get started.
In 2026, WordPress installation is simple, fast, and beginner-friendly. Most hosting providers now offer one-click setup options that let you install WordPress in just a few minutes, without touching any code or complicated settings.
In this step-by-step guide, I’ll show you:
- The easiest way to install WordPress (recommended for beginners)
- An optional manual method (for learning purposes)
- What to do right after installation to set up your WordPress dashboard properly
By the end of this post, you’ll have a fully working WordPress website, ready for content creation and customization.
What Is WordPress?
WordPress is a free content management system (CMS) that lets you build websites and blogs without technical knowledge. Instead of writing code, you can create, edit, and manage your website using a simple dashboard, making WordPress ideal for beginners as well as experienced users.
WordPress is open-source, regularly updated, and supported by a large global community. This means you’ll always find themes, plugins, tutorials, and help when you need it — one of the main reasons WordPress is so popular.
It powers 40%+ of websites worldwide and is ideal for:
- Blogs
- Personal websites
- Business sites
- Portfolios
What You Need Before Installing WordPress
Before we begin, make sure you have:
- A domain name (example: yoursite.com)
- A web hosting account
- Access to your hosting dashboard (cPanel or custom panel)
If you haven’t chosen hosting yet, read: Best WordPress Hosting & Domain for Beginners (2026)
Method 1: One-Click WordPress Installation on Hostinger (Recommended)
Most beginners choose Hostinger because it offers a clean dashboard and an easy WordPress auto-installer.
If you’re using Hostinger, follow the steps below.
Step 1: Log in to Your Hostinger Account
- Go to Hostinger and log in
- Open hPanel
- Select your hosting plan
- Click Websites from the left menu
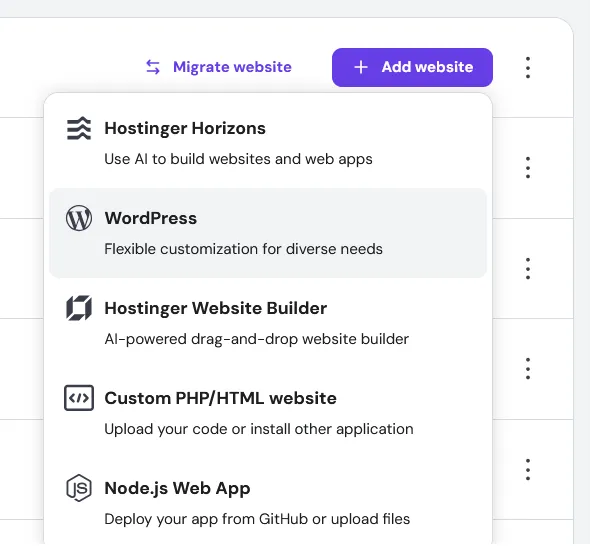
Step 2: Choose “Add Website”
- Click Add Website
- Select WordPress
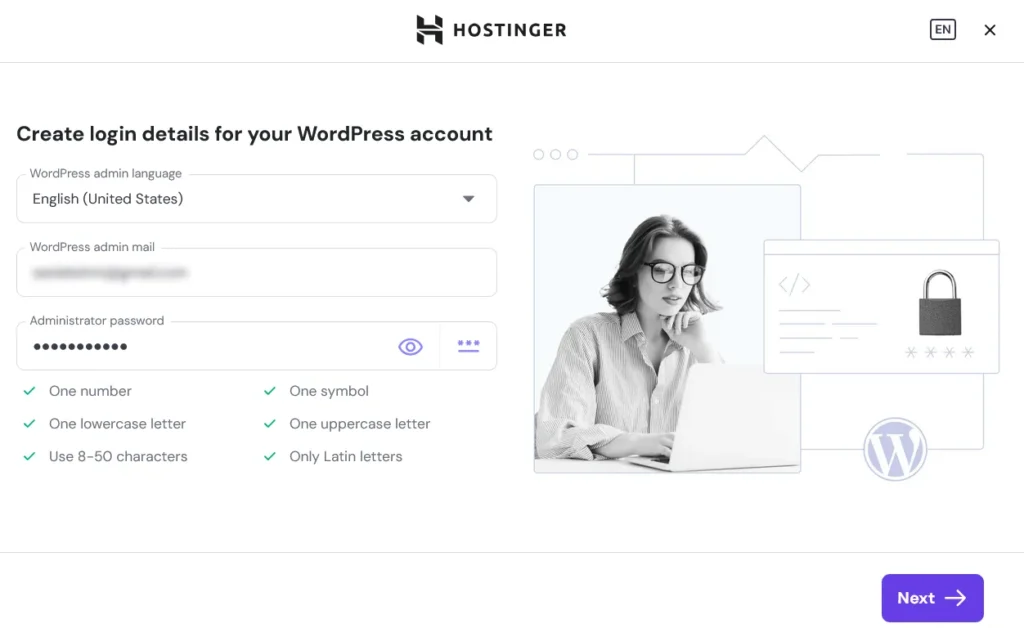
Step 3: Create Your WordPress Login Details
Enter:
- Admin email
- Username
- Strong password
Save these details — you’ll need them to log in later.
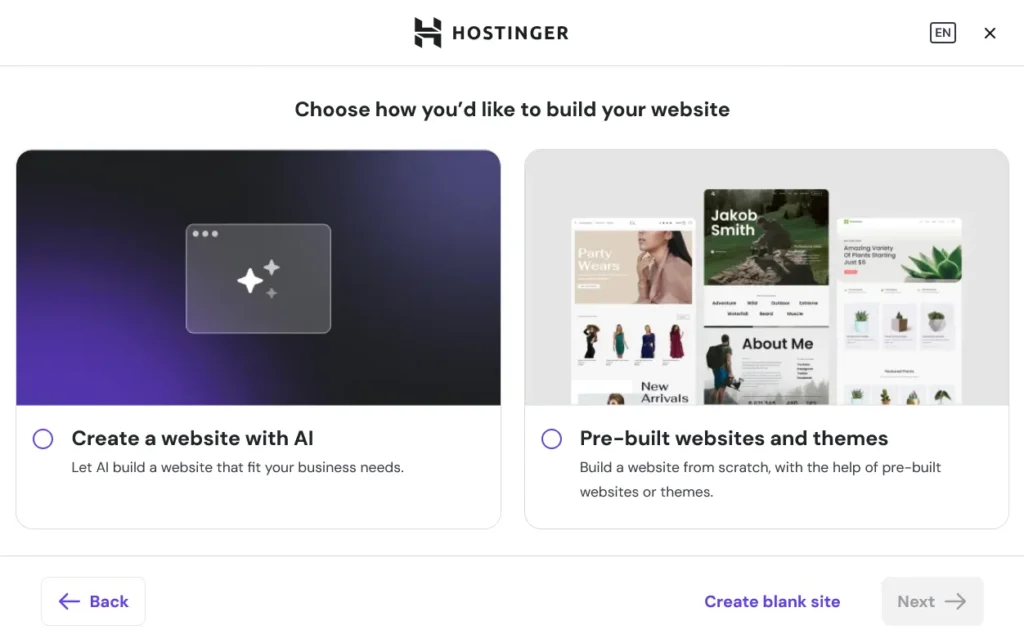
Step 4: Choose How You Want to Build Your WordPress Website (Theme Setup)
After creating your WordPress login details, Hostinger will ask how you want to build your website.
You’ll see two options:
- Create a website with AI
- Pre-built websites and themes
For beginners, I recommend choosing Pre-built websites and themes.
This option:
- Installs WordPress normally
- Lets you choose or change themes later
- Gives you more control over your site structure
If you prefer to start completely from scratch, you can also click Create blank site at the bottom.
Don’t worry too much about this step — you can change your WordPress theme anytime from the dashboard.
Even if you select a theme here, WordPress allows you to install, switch, or customize themes later without affecting your content.
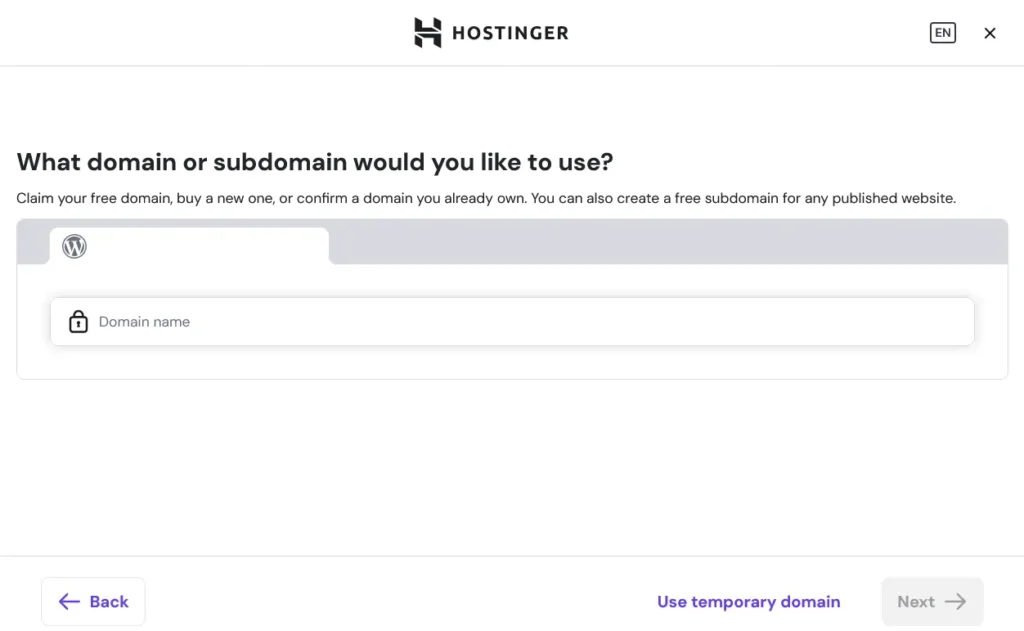
Step 5: Select Your Domain
- Choose the domain you purchased
- Make sure WordPress is installed on the main domain, not a subfolder
Hostinger will now automatically:
- Install WordPress
- Set up the database
- Configure basic settings
This usually takes 1–2 minutes.
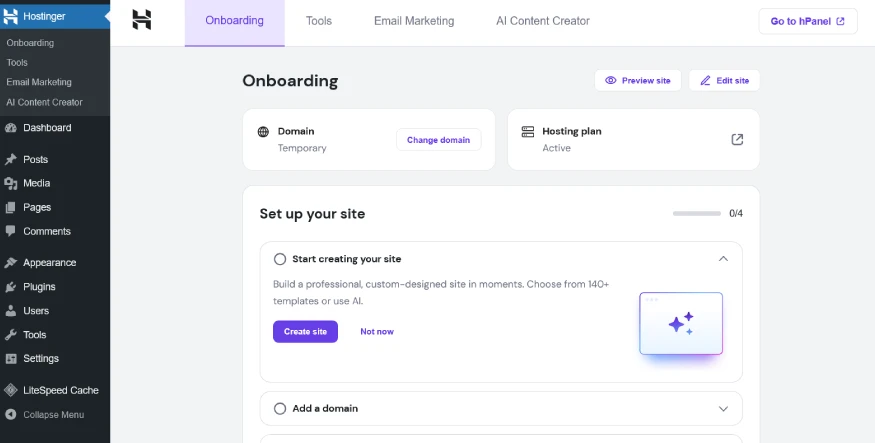
Step 6: Installation Complete
Once done, you’ll see a success message.
You can now:
- Visit your website
- Access the WordPress dashboard directly from Hostinger
- Or log in manually via: yourdomain.com/wp-admin
How to Access WordPress Dashboard on Hostinger
You can log in in two ways:
Option 1: From Hostinger Dashboard
- Go to Websites
- Click Admin Panel
Option 2: Direct Login URL
- Visit:
yourdomain.com/wp-admin - Enter your username & password
Both methods work.
Important Notes for Hostinger Users
- No need to create a database manually
- No file uploads required
- WordPress comes pre-configured
- Ideal for beginners
This is why one-click installation is recommended over manual installation.
If you’re using a different hosting provider, the steps will be similar. Look for options like “WordPress Installer”, “Auto Installer”, or “Softaculous” in your hosting dashboard.
Method 2: Manual WordPress Installation (Optional)
You do not need this method as a beginner, but it’s good to understand how WordPress works. Download from wordpress.org, upload via FTP. Use if one-click fails.
High-Level Steps:
- Download WP Zip: Get latest from official site > Unzip on desktop.
- Create MySQL Database: Hosting cPanel > “MySQL Databases” > New DB/user > Assign privileges.
- Upload Files: File Manager or FTP (FileZilla) > public_html > Upload unzipped files.
- Run Installer: Visit yourdomain.com > Follow 5-minute setup (DB name/user/pass from step 2).
- Login: yourdomain.com/wp-admin.
I recommend one-click installation unless you specifically want hands-on learning.
First Things to Do After Installing WordPress
Don’t skip this part — it saves future confusion.
- Access at yourdomain.com/wp-admin—change these before adding content:
- General Settings: Settings > General > Update Site Title, Tagline (e.g., “Your WordPress Guide”), Timezone (Asia/Kolkata).
- Permalinks: Settings > Permalinks > Select “Post name” for SEO-friendly URLs (yourdomain.com/my-first-post).
- WordPress Users: Users > Your Profile > Add display name/photo; enable 2FA if plugin installed.
- Reading Settings: Set homepage (static “Home” page later) and posts per page (6-9).
- Discussion: Uncheck “Auto-approve comments” for spam control.
- Privacy: Enable search engines (uncheck “Discourage” box).
Quick SSL Check: Visit site > Padlock icon? Good. Hosting usually auto-adds free SSL.
Common WordPress Installation Mistakes to Avoid
- Installing WordPress inside a folder (example.com/wp)
- Forgetting admin login details
- Using weak passwords
- Skipping permalink settings
Avoid these and you’re already ahead of most beginners.
What’s Next After Installing WordPress?
Now that WordPress is installed, your next steps are:
- Learn how to write blog content
- Choose a theme
- Install essential plugins
- Optimize content for SEO
Once your site is installed and configured, the next step is making sure people actually find it — see my complete guide on how to drive traffic to your website for the full roadmap.
Final Thoughts
Installing WordPress is the first real milestone in your website journey. Once this step is done, everything else — writing content, SEO, customization — becomes much easier.
Your next step is learning how to create content that people actually want to read.
Checklist Recap
- Domain & hosting ready
- WordPress installed
- Dashboard accessible
- Basic settings updated
Your website is officially live.