Crawl errors are one of those issues that can quietly damage your site’s search performance for weeks before you notice anything wrong. Googlebot visits your site, hits a problem, cannot access the page — and moves on. No warning in your browser, no visible issue for your visitors, but the affected pages stay out of Google’s index and out of search results.
Crawl errors occur when Googlebot attempts to access a page on your website but encounters a technical problem that prevents it from successfully crawling or processing the URL. Common crawl errors include 404 Not Found errors, 403 Forbidden errors, server errors (5xx), redirect errors, DNS failures, and soft 404 pages.
I find crawl errors on almost every WordPress site I audit. Not always critical ones, but they are almost always present — and on sites that have never had a proper technical SEO audit, they tend to be significant. The good news is that most crawl errors have clear, identifiable causes and straightforward fixes once you know what to look for.
This guide covers every crawl error type you will encounter in Google Search Console on a WordPress site, what causes each one specifically in the WordPress environment, and exactly how to fix them.
What Are Crawl Errors and Where Do You Find Them?
A crawl error occurs when Googlebot attempts to visit a URL on your site and receives a response that prevents it from successfully accessing or processing the page. The error can happen at different stages — the server connection itself, the HTTP response code, the page content, or the robots directives on the page.
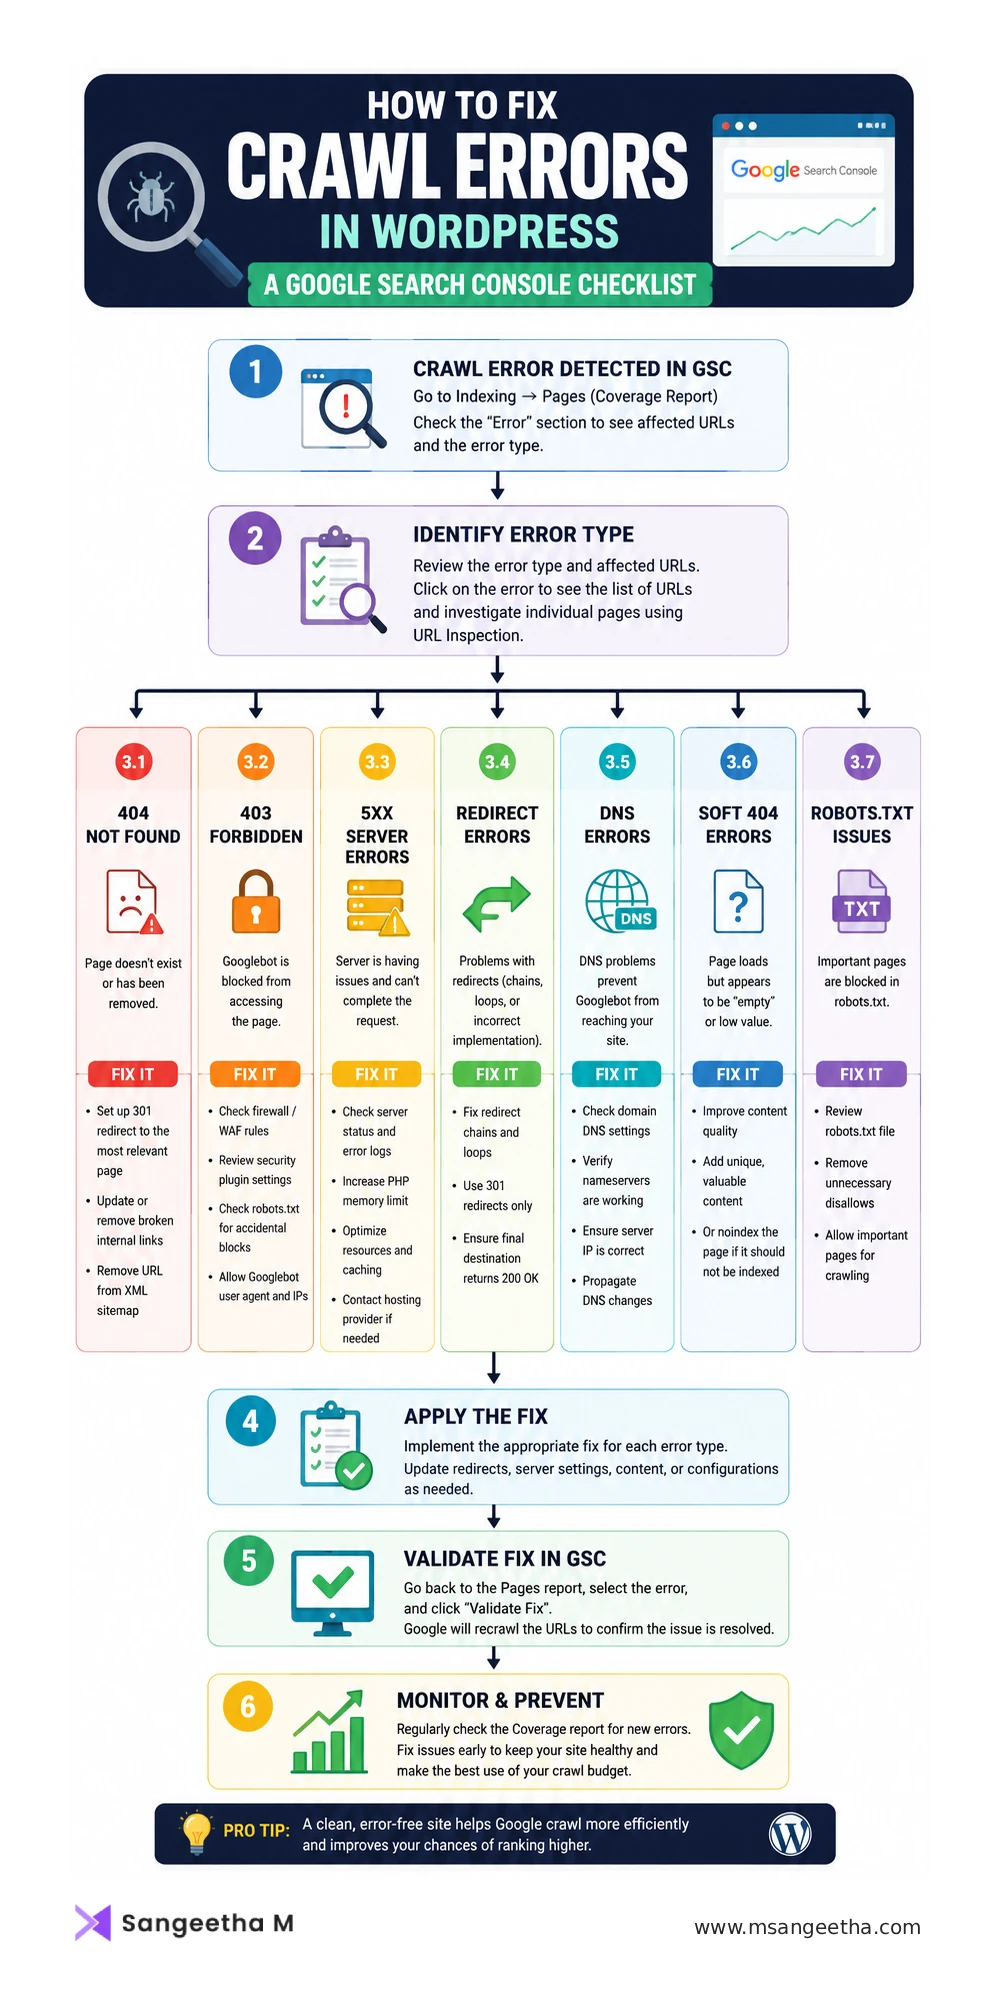
In Google Search Console, crawl errors surface in two places:
The Pages Report (Coverage Report) — under Indexing → Pages in the left sidebar. The Error category (shown in red) lists all URLs that could not be indexed due to a specific technical problem. Click on any error type to see the affected URLs and drill into individual pages. I cover how to read this report in full in my guide to the GSC Coverage Report.
The URL Inspection tool — enter any specific URL to see its individual crawl status, including the exact HTTP response code and page fetch result. This is where you diagnose the root cause for specific pages identified in the Coverage Report.
The workflow I use: identify the error type and volume in the Coverage Report → drill into specific URLs using URL Inspection → diagnose root cause → apply fix → validate using the “Validate Fix” button in GSC.
404 Not Found Errors
404 errors are the most common crawl error on WordPress sites. They occur when Googlebot visits a URL that no longer exists — the server responds that the page cannot be found.
Common causes on WordPress sites
- Posts or pages deleted without setting up a redirect from the old URL
- URL slug changed without redirecting the old URL to the new one
- Internal links pointing to old URLs after a site migration or restructure
- External sites linking to pages that no longer exist
- WordPress tag or category pages deleted but still referenced in sitemaps or internal links
- Permalink structure changed site-wide without redirect rules in place
How to fix 404 errors
Step 1 — Identify which 404s matter. Not all 404s need fixing. In GSC, click on the “Not Found (404)” error type and review the affected URLs. The ones that need attention are: pages that previously ranked or generated traffic, pages that other sites link to, and pages that your own site links to internally. A 404 on a URL that was never indexed, never linked to, and never ranked is not worth spending time on.
Step 2 — Set up 301 redirects for important 404s. For any deleted page that had content value, set up a 301 redirect from the old URL to the most relevant existing page. In WordPress, the Redirection plugin handles this cleanly with no code required. Go to Tools → Redirection, add the old URL as the source and the new URL as the target, and save. A 301 tells Google the move is permanent and passes the original page’s link equity to the new destination.
Step 3 — Fix broken internal links. If your own pages are linking to 404 URLs, update those links. Use the Links report in GSC (under Links → Internal Links) to find which pages are linking to the broken URL, then edit those pages to update or remove the broken link. Do not leave internal links pointing to 404 pages — it wastes crawl budget and creates a poor user experience.
Step 4 — Update your sitemap. If 404 URLs are still appearing in your XML sitemap, remove them. Your sitemap should only contain URLs that return a 200 OK response. In Rank Math, go to Sitemap settings and regenerate the sitemap after removing or redirecting 404 pages.
A small number of 404 errors is normal on any site — pages get deleted, URLs change. What you want to avoid is a large and growing 404 count, which signals to Google that your site is poorly maintained and reduces crawl budget efficiency over time.
403 Forbidden Errors
A 403 error means Googlebot reached your server but was denied access to the page. The server understood the request but refused to fulfil it. This is different from a 404 — the page exists, but something is blocking Googlebot specifically from accessing it.
Common causes on WordPress sites
- WAF (Web Application Firewall) rules at the hosting or CDN level blocking Googlebot’s user agent or IP range
- Security plugins (Wordfence, iThemes Security) with overly aggressive bot-blocking or rate-limiting settings
- Cloudflare firewall rules blocking non-browser user agents on specific URL paths
- Server-level access restrictions on specific directories or URL patterns
- URL slugs containing words that trigger WAF pattern-matching rules — slugs like “403-error,” “forbidden,” “hack,” or “attack” can sometimes cause the server to block the request, interpreting it as a security probe
- Membership or access restriction plugins accidentally applied to public content
How to fix 403 errors
Step 1 — Identify where the block originates. In GSC, use “Test Live URL” on the affected page and examine the HTTP response headers. The headers will often indicate whether the block is coming from your server, your CDN (Cloudflare, etc.), or a plugin. Look for headers like cf-ray (Cloudflare) or server-specific security headers.
Step 2 — Check your hosting firewall. Log into your hosting control panel and look for WAF or firewall settings. If your host offers a WAF (Hostinger, SiteGround, Kinsta all do), check whether any rules are matching Googlebot’s user agent or the specific URL pattern. Whitelist Googlebot’s IP ranges if the option is available.
Step 3 — Check security plugin settings. If you use Wordfence or similar, go to the firewall settings and check whether bot blocking or rate limiting is catching Googlebot. Wordfence has an option to allowlist specific IP ranges — you can add Google’s crawl IP ranges to the allowlist.
Step 4 — Check Cloudflare rules. If your site runs through Cloudflare, go to Security → WAF and review custom rules. Check whether any rules block requests based on user agent, path pattern, or request type in a way that would catch Googlebot.
Step 5 — Check access restriction plugins. If you use a membership plugin or any plugin that restricts content access, verify that it is not accidentally applying restrictions to public posts or pages.
Note: do not change the URL slug as a first response to a 403 error. If the block is coming from a server-level rule, renaming the slug may not resolve it, and it creates a redirect chain issue if the old URL had any inbound links.
Server Errors (5xx)
5xx errors mean Googlebot reached your server but the server failed to respond correctly — it crashed, timed out, or was unavailable. These are server-side failures, not content issues.
The main types
500 Internal Server Error — a generic server-side failure. Something went wrong during the request processing. On WordPress sites this is often a PHP error, a plugin conflict, or a memory limit issue.
502 Bad Gateway — the server received an invalid response from an upstream server. Common when a reverse proxy or CDN cannot communicate with the origin server. I cover this in detail in my guide to fixing 502 errors in WordPress.
503 Service Unavailable — the server is temporarily unable to handle requests. Often caused by server overload, maintenance mode, or resource limits being hit. WordPress puts itself into maintenance mode during plugin and theme updates (displaying a .maintenance file) — if Googlebot visits during this window, it receives a 503.
504 Gateway Timeout — the server took too long to respond. Common on resource-heavy pages where PHP execution time exceeds the server’s timeout limit.
Common causes on WordPress sites
- PHP memory limit too low for the page’s resource requirements
- Plugin conflicts causing PHP fatal errors on specific pages
- Database query timeouts on pages with complex queries or poorly optimised plugins
- Server resource spikes when Googlebot crawls multiple pages simultaneously
- Caching not working correctly, causing every Googlebot visit to trigger full PHP execution
- Hosting plan resource limits being hit during peak crawl periods
How to fix 5xx errors
Step 1 — Check your server error logs. In your hosting control panel, find the error logs for the time period when the 5xx errors occurred. PHP fatal errors, memory limit messages, and timeout notices will appear here with the specific file or plugin that caused them.
Step 2 — Increase PHP memory limit. In your WordPress wp-config.php file, add or increase: define('WP_MEMORY_LIMIT', '256M');. Many 500 errors on WordPress are caused by the default 64MB or 128MB memory limit being insufficient for the plugins and theme running on the page.
Step 3 — Identify plugin conflicts. If the 5xx errors are limited to specific pages, check whether those pages use a specific plugin or widget that other pages do not. Deactivate plugins one by one (starting with recently installed or updated ones) to identify the conflict.
Step 4 — Ensure caching is working. WP Rocket, LiteSpeed Cache, and similar plugins serve cached HTML to Googlebot, preventing it from triggering full PHP execution on every visit. If caching is not working correctly — for example, if specific post types or URL patterns are excluded from caching — Googlebot’s crawl can overwhelm the server. Check your caching plugin settings and confirm cached pages are being served to Googlebot using the “Test Live URL” feature in GSC.
Step 5 — Contact your host. If 5xx errors are widespread and persistent, the issue may be at the hosting infrastructure level rather than a WordPress configuration issue. Share the GSC error report and server logs with your host’s support team.
Also read: Common WordPress Errors & Troubleshooting Guide — A complete guide to diagnosing and fixing WordPress errors including 500 Internal Server Errors, database connection failures, white screen issues, plugin conflicts, and other common site problems that can lead to crawl errors.
Redirect Errors
Redirect errors occur when Googlebot follows a redirect chain and encounters a problem — either the chain is too long, it loops back on itself, or the final destination returns an error.
Common causes on WordPress sites
- Redirect chains — page A redirects to page B which redirects to page C (and sometimes further). Each hop adds latency and reduces the link equity passed along the chain
- Redirect loops — page A redirects to page B which redirects back to page A, creating an infinite loop that Googlebot cannot resolve
- HTTP to HTTPS redirects conflicting with plugin or server-level redirects
- www to non-www redirects set in multiple places creating conflicts
- Incorrect redirect rules in .htaccess created by plugins or manual edits
How to fix redirect errors
Step 1 — Identify the redirect chain or loop. Use a tool like Screaming Frog, Redirect Path (browser extension), or an online redirect checker to trace the full redirect chain for the affected URL. You need to see every hop from the original URL to the final destination.
Step 2 — Collapse redirect chains. If page A redirects to B redirects to C, update the redirect so page A points directly to C. Each intermediate hop is unnecessary and reduces the link equity passed along the chain. In the Redirection plugin, update the source URL to point directly to the final destination.
Step 3 — Identify and break redirect loops. A loop means one of the redirects in the chain points back to a URL earlier in the chain. Trace the full chain to find the loop, then either remove the circular redirect or update it to point to the correct final destination. I cover the full diagnosis and fix process in my post on redirect loops and chains in WordPress.
Step 4 — Check for conflicting redirect rules. On WordPress, redirects can be set in multiple places: the Redirection plugin, .htaccess, your SEO plugin, your theme, your caching plugin, and at the server or CDN level. Conflicts between these layers are a common cause of loops. Check each layer systematically and ensure only one place is managing each redirect.
DNS Errors
A DNS error means Googlebot could not connect to your domain at all — the DNS lookup failed. This is less common than the other error types but worth understanding.
Common causes
- Domain registration expired
- DNS nameserver misconfiguration after a hosting migration
- Temporary DNS propagation issues after changing nameservers
- Hosting provider outage affecting DNS resolution
How to fix DNS errors
Check your domain registration status and expiry date first. Then verify your nameserver settings in your domain registrar’s control panel match what your hosting provider specifies. Use a DNS checker tool to confirm your domain resolves correctly from multiple locations. If the DNS error was temporary and your site is now resolving correctly, request indexing in GSC after confirming resolution — the error should clear once Googlebot successfully crawls the page.
Soft 404 Errors
A soft 404 is a page that returns a 200 OK HTTP response — technically telling Google the page exists and is healthy — but the content signals that the page is effectively empty or non-existent. Google treats these as functional 404s and will not index them.
Common causes on WordPress sites
- Empty tag or category archive pages with no posts assigned to them
- WooCommerce product pages showing “out of stock” or “product unavailable” with no other content
- Search results pages with no results (WordPress search at
/?s=query) - Author archive pages for authors who have no published posts
- Pages with content loaded entirely via JavaScript that Googlebot cannot render — the page appears blank to Google even though content displays in the browser
How to fix soft 404 errors
For empty archive pages — either add content to them or add a noindex tag to exclude them from indexing intentionally. Empty tag archives are almost never worth indexing and are better noindexed in your SEO plugin settings.
For WooCommerce out-of-stock pages — either keep the page with full product information and an “out of stock” notice (Google can index the product page even if it is unavailable), or redirect the URL to a relevant category page if the product is permanently discontinued.
For JavaScript-rendered content appearing blank to Google — move critical content into static HTML rather than loading it dynamically after page render. Use “View Crawled Page” in GSC URL Inspection to confirm what Google sees versus what your browser shows.
Robots.txt Blocked Pages Appearing as Crawl Errors
If pages are blocked in your robots.txt file but Google is still reporting them in the Coverage Report as an issue, check the specific error type. “Blocked by robots.txt” in the Not Indexed category is not technically a crawl error — it is an intentional exclusion. However, if pages that should be indexable are appearing with robots.txt blocks, you have an overly broad Disallow rule catching content it should not.
The most common cause on WordPress sites: a Disallow rule like Disallow: /wp-content/ that was intended to block admin assets but is also blocking CSS and JavaScript files that Googlebot needs to render the page correctly. Check your robots.txt carefully and test it using the robots.txt tester in GSC (under Settings → robots.txt).
How to Prevent Crawl Errors From Recurring
Fixing crawl errors is only half the job — the other half is preventing them from building up again. These habits keep crawl error counts low on sites I manage:
Always set up a 301 redirect before deleting or renaming any page. This is the single most effective habit for preventing 404 errors. Before you delete a post, change a slug, or restructure your URL hierarchy, set up the redirect first. The Redirection plugin makes this easy and can even automatically create redirects when you change a post slug in WordPress.
Review the Coverage Report monthly. Catching errors when they affect 5 pages is much easier than when they affect 500. A monthly check as part of your routine SEO maintenance keeps the error count manageable.
Check the Coverage Report immediately after major site changes. Theme updates, plugin installations, URL restructuring, hosting migrations — all of these can introduce crawl errors. Check GSC within a few days of any significant site change.
Keep your sitemap clean. Only include URLs in your sitemap that return a 200 OK response. Submitting redirect URLs or deleted pages in your sitemap forces Googlebot to spend crawl budget following chains to final destinations or hitting dead ends.
Ensure caching works correctly for Googlebot. A well-configured caching plugin protects your server from crawl-induced resource spikes and prevents the 5xx errors that come from Googlebot overwhelming a resource-limited server.
Crawl Errors vs Indexing Issues
A crawl error occurs when Google cannot successfully access a page. An indexing issue occurs when Google can access the page but chooses not to add it to its index.
| Issue | Crawl Error? | Indexed? |
|---|---|---|
| 404 Not Found | Yes | No |
| 500 Server Error | Yes | No |
| Crawled – Currently Not Indexed | No | No |
| Duplicate Without Canonical | No | Usually No |
Crawl Error Troubleshooting Checklist
If you want a quick reference, use this checklist to identify the crawl error type, apply the correct fix, and validate the solution in Google Search Console.
Frequently Asked Questions
What are crawl errors in Google Search Console?
Crawl errors occur when Googlebot attempts to visit a URL on your site and receives a response that prevents it from successfully accessing or indexing the page. In GSC, they appear in the Pages Report (Coverage Report) under the Error category in red. Common types include 404 Not Found (page does not exist), 403 Forbidden (access denied to Googlebot), 5xx server errors (server-side failures), redirect errors (loops or broken chains), and soft 404s (pages that return 200 OK but have no meaningful content). Each error type has a specific cause and fix.
Do crawl errors hurt SEO?
Yes, in several ways. Pages with crawl errors cannot be indexed and therefore cannot appear in Google Search results. If Google can crawl a page successfully but still does not index it, see my guide on why pages are not indexed in Google. A large number of 404 errors signals to Google that the site is poorly maintained, which can reduce crawl budget allocation over time. Server errors (5xx) during Googlebot’s crawl can cause it to deprioritise your site and crawl less frequently. Redirect chains and loops waste crawl budget on navigation rather than content discovery. Not all crawl errors are equally damaging — a few 404s on low-value pages are normal — but patterns of errors across important pages directly affect your site’s search visibility.
How do I find crawl errors in Google Search Console?
In GSC, go to Indexing → Pages in the left sidebar. This is the Coverage Report (also called the Pages Report). The Error category shown in red lists all URLs that could not be indexed due to a technical problem. Click on any error type to see the specific URLs affected and the number of pages involved. For individual page diagnosis, use the URL Inspection tool — enter the specific URL and check the Page fetch result and crawl details to see exactly what error Googlebot encountered and when.
Should I fix all 404 errors in GSC?
No — not all 404 errors need fixing. Focus on 404s that affect pages that previously ranked or generated traffic, pages that other sites link to externally, and pages that your own site links to internally. A 404 on a URL that was never indexed, never linked to, and never ranked does not need a redirect — Google will simply drop it from its discovered URL list over time. Spending time redirecting every low-value 404 is not an efficient use of your SEO effort. Use the URL Inspection tool and your analytics data to identify which 404s actually matter before taking action.
What causes 403 errors in Google Search Console on a WordPress site?
A 403 error in GSC means Googlebot was denied access to the page by the server, even though the page is live and accessible to human visitors. Common causes on WordPress sites include WAF rules at the hosting or CDN level blocking Googlebot’s user agent, security plugins with aggressive bot-blocking settings, Cloudflare firewall rules, and server-level access restrictions on specific URL paths. An unusual cause I have encountered: URL slugs containing words like “403,” “forbidden,” or “hack” can trigger server-side pattern-matching rules that block the request as a suspected security probe — even though the page is completely public.
How Crawl Errors Affect Crawl Budget
When Googlebot repeatedly encounters 404 pages, redirect chains, or server errors, it spends time crawling problem URLs instead of discovering and refreshing important content. On small sites the impact is usually minor, but on larger sites with hundreds or thousands of URLs, crawl errors can significantly reduce crawl efficiency.
How long does it take for GSC to clear crawl errors after fixing them?
After fixing a crawl error, use the “Validate Fix” button in the GSC Coverage Report to trigger a re-crawl of affected URLs. GSC will begin checking whether the fix is in place — this typically takes a few days to a few weeks depending on how many pages are involved and how frequently Google crawls your site. The validation status will update from “Started” to “Passed” once Google has confirmed the fix across the affected URLs. Do not expect the error count to drop immediately — validation is not instantaneous and depends on Googlebot’s crawl schedule for your site.