Google Search Console Is the First Tool You Should Set Up on Any WordPress Site
If you have a WordPress site and you want it to appear in Google search results, Google Search Console is not optional. It is the direct communication channel between your website and Google. It tells you which of your pages are indexed, which keywords are driving traffic, whether Google can crawl your site correctly, and when something goes wrong.
I set up Google Search Console on every WordPress site I build or audit — my own site, client sites, and any new project before anything else. It is free, it takes about ten minutes to configure, and without it you are essentially flying blind on how Google sees your site.
In this guide I will walk you through the complete setup process, from adding your site to submitting your sitemap, and show you which reports to check first once everything is connected.
What Is Google Search Console?
Google Search Console (GSC) is a free tool provided by Google that lets you monitor and manage your website’s presence in Google Search. It is not an analytics tool in the way GA4 is — it does not track user behavior on your site. Instead, it focuses specifically on how Google discovers, crawls, and indexes your content.
The main things GSC lets you do are:
- See which pages Google has indexed and which it has not
- Find out which search queries are bringing visitors to your site
- Submit your sitemap so Google discovers your content faster
- Check for crawl errors, indexing issues, and security problems
- Request indexing for new or updated pages
- Monitor your Core Web Vitals performance as Google measures it
- Receive manual action notifications if Google penalizes your site
For a WordPress site owner doing any kind of SEO, GSC is the most important free tool in your toolkit. Everything else — keyword tools, rank trackers, audit tools — is secondary to what GSC gives you directly from Google.
Before You Start: What You Need
Before setting up GSC, make sure you have the following:
- A Google account — a Gmail address works fine
- Access to your WordPress site’s admin dashboard
- An SEO plugin installed — Rank Math or Yoast SEO; both make verification simple
- Your site should be live and accessible; GSC cannot verify a site that is in maintenance mode or returning errors
If you are not yet using an SEO plugin, now is a good time to choose one. I have compared the two most popular options in detail: Yoast SEO vs Rank Math and Rank Math vs All in One SEO.
Step 1: Go to Google Search Console and Add Your Property
Go to search.google.com/search-console and sign in with your Google account. If this is your first time, you will be taken directly to the property setup screen. If you have used GSC before, click the property selector dropdown in the top left and choose “Add property.”
GSC offers two property types:
- Domain property — covers all URLs across all subdomains and both http and https versions of your domain. For example, adding
msangeetha.comas a domain property would cover www.msangeetha.com, blog.msangeetha.com, and any other subdomain. Verification requires adding a DNS TXT record. - URL prefix property — covers only URLs that begin with the exact URL you enter. For example,
https://www.msangeetha.comcovers only that specific version. Multiple verification methods are available.
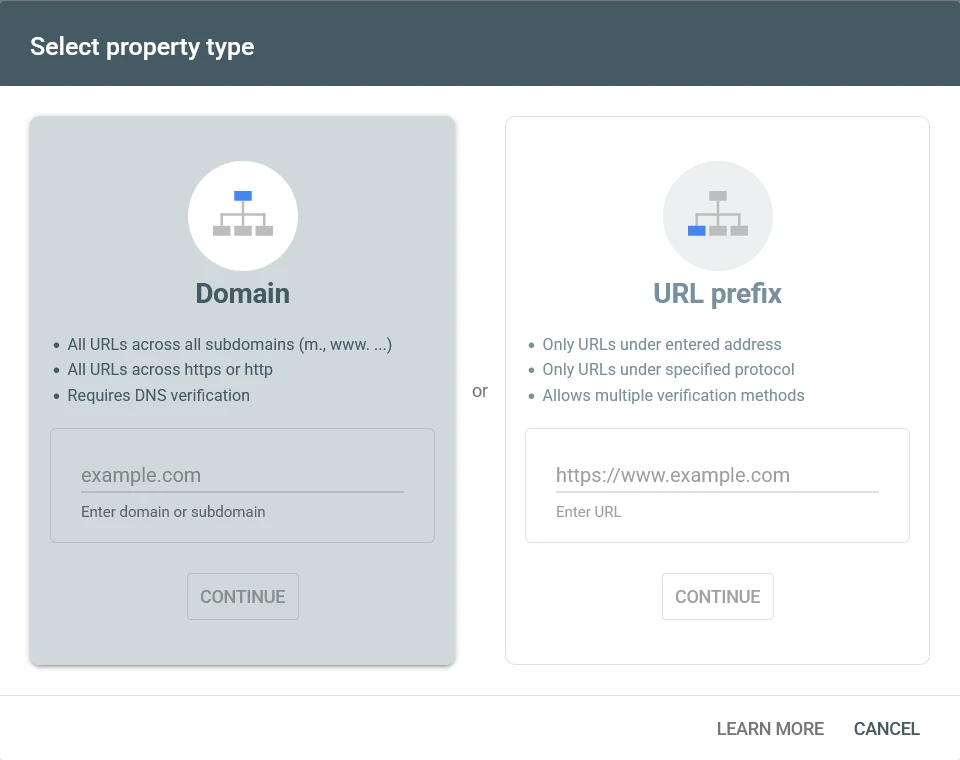
I recommend the Domain property if you are comfortable adding a DNS record, because it gives you complete coverage in a single property. If DNS sounds unfamiliar, the URL prefix property is easier to verify and works well for most WordPress sites as long as you enter the correct canonical version of your URL — the version your site actually uses with or without www.
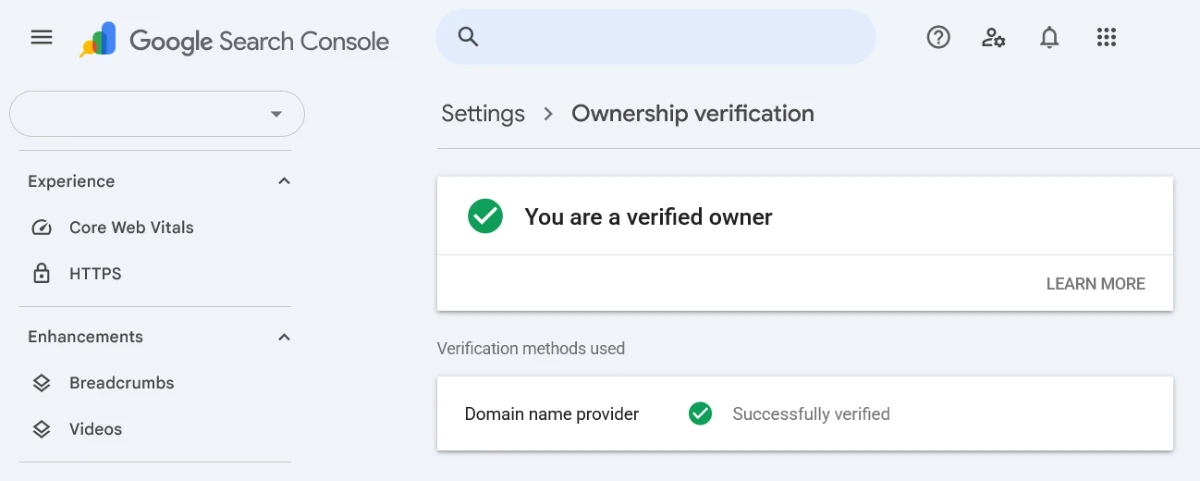
Step 2: Verify Site Ownership
Verification proves to Google that you own the site you are adding. The method depends on which property type you chose.
Verifying a Domain Property (DNS TXT Record)
GSC will show you a TXT record value that looks something like google-site-verification=abc123xyz.... You need to add this as a TXT record in your domain’s DNS settings.
How you access DNS settings depends on where your domain is registered. If your domain is on Hostinger, log in to your Hostinger account, go to Domains → Manage → DNS / Nameservers, and add a new TXT record with the value Google provides. Leave the name field as @ for the root domain.
DNS changes can take a few minutes to a few hours to propagate. Once the record is live, click Verify in GSC. You can use a DNS lookup tool to check whether the record is visible before verifying.
Verifying a URL Prefix Property
URL prefix properties offer more verification options. The easiest for WordPress users is the HTML tag method:
- GSC gives you a meta tag that looks like:
<meta name="google-site-verification" content="abc123xyz"> - Copy the content value (the part inside the quotes after
content=) - In Rank Math, go to General Settings → Webmaster Tools → Google Search Console and paste the value there. Save settings.
- In Yoast, go to SEO → General → Webmaster Tools tab, paste into the Google verification field, and save.
- Return to GSC and click Verify.
Other URL prefix verification options include uploading an HTML file to your server root, adding a Google Analytics tracking code (if GA4 is already set up and uses the same Google account), or adding a Google Tag Manager container. Any of these works — use whichever is most convenient for your setup.
| Method | Difficulty | Recommended |
|---|---|---|
| DNS TXT | Medium | Best |
| HTML Tag | Easy | Most beginners |
| GA4 | Easy | If GA4 already installed |
| GTM | Medium | Advanced users |
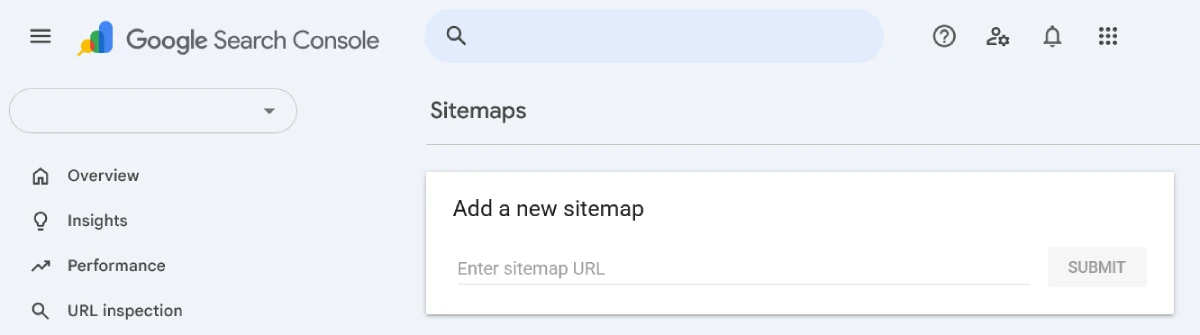
Step 3: Submit Your XML Sitemap
After verification, the next step is submitting your sitemap. A sitemap is an XML file that lists all the URLs on your site, helping Google discover your content efficiently. I have a full explanation of what sitemaps are and how they work in my XML sitemap guide.
In GSC, go to Sitemaps in the left navigation. In the “Add a new sitemap” field, enter your sitemap URL and click Submit.
For most WordPress sites the sitemap URLs are:
- Rank Math:
https://yourdomain.com/sitemap_index.xml - Yoast SEO:
https://yourdomain.com/sitemap_index.xml - All in One SEO:
https://yourdomain.com/sitemap.xml
Submit the sitemap index file rather than individual sitemaps. The index file references all your individual sitemaps — posts, pages, categories, images — so Google gets a complete picture from one submission.
After submission, GSC will show the sitemap status, how many URLs were submitted, and how many were indexed. There is often a gap between submitted and indexed URLs, which is normal. If the gap is very large, it is worth investigating — my GSC coverage report guide explains how to read and interpret this data.
Step 4: Link Google Search Console to GA4
Connecting GSC to your GA4 property unlocks the Search Console reports inside GA4, including the Queries report which shows which keywords are driving organic traffic to specific pages. This is one of the most valuable integrations available for free.
To link them, go to GA4 Admin → Property Settings → Product Links → Search Console Links. Click Add, select your verified GSC property, choose your web data stream, and confirm. The Search Console collection will appear in your GA4 Reports section within 24 to 48 hours.
The First Reports to Check After Setup
Once GSC is set up and a few days of data have accumulated, these are the reports I check first on any new site:
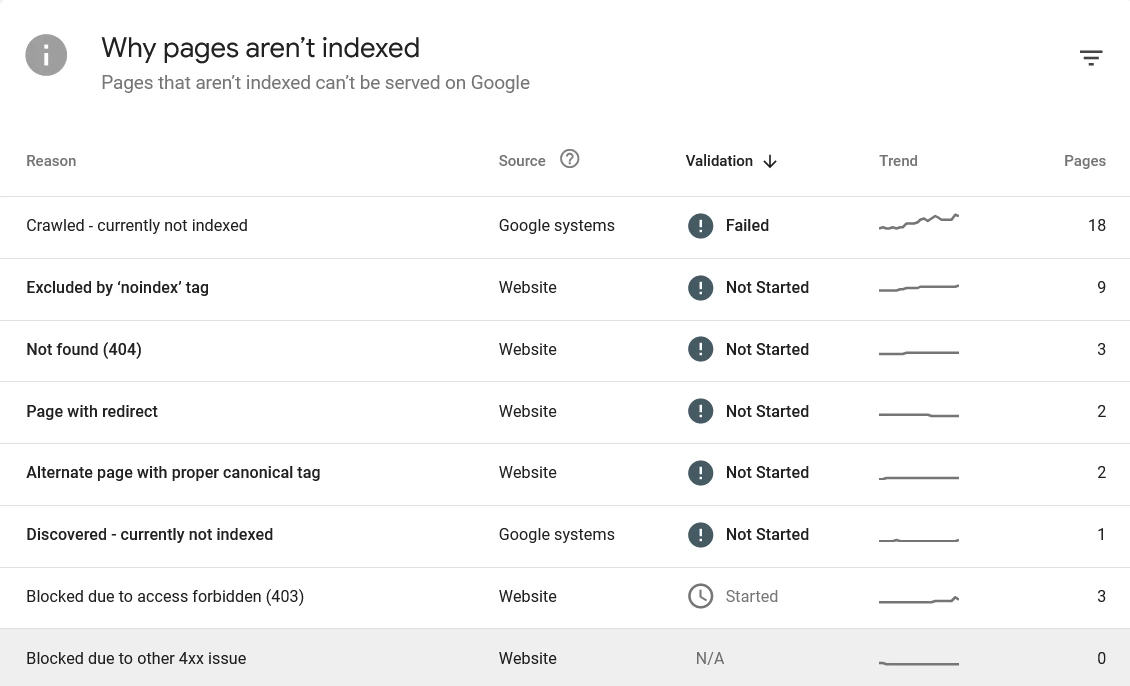
Coverage Report (Indexing)
Go to Indexing → Pages. This report shows which pages Google has indexed, which it has tried to index but encountered issues with, and which it has not indexed and why. The status categories can be confusing at first — I have written a dedicated post explaining every GSC indexing status in plain language.
The most common issues you will see on a new WordPress site are:
- Pages excluded by noindex — check that you have not accidentally set pages to noindex in your SEO plugin
- Discovered but not yet indexed — Google knows the page exists but has not crawled it yet; this is normal for new sites and new content
- Crawled but not indexed — Google crawled the page but decided not to index it; this usually points to thin content or quality issues
If specific pages are not getting indexed, my post on why your page is not indexed covers the most common causes and how to fix them.
Search Results Performance Report
Go to Search results under the Performance section. This report shows total clicks, impressions, average click-through rate, and average position for your site in Google search.
The most useful view here is the Queries tab, which shows which search terms are generating impressions and clicks. Sorting by impressions shows you where you are visible in search but not yet converting that visibility into traffic. A high-impression, low-CTR keyword often means your title tag or meta description needs work. Tools such as SEO plugins, SERP preview tools, and other on-page optimization tools can help improve these elements. See my guide to the best on-page SEO tools for WordPress site owners.
The Pages tab shows performance by individual URL, which helps you identify your strongest pages and spot pages that are getting impressions but no clicks at all.
Crawl Errors
Go to Settings → Crawl stats, or check the Coverage report for pages with errors. Common crawl errors on WordPress sites include 404 errors from deleted or moved pages, redirect issues, and server errors. I have a full guide on how to fix crawl errors in WordPress that walks through each error type and the fix.
If you are seeing redirect-related errors, see my post on redirect loops and chains in WordPress — these are a common cause of crawl problems and can prevent pages from being indexed correctly.
Core Web Vitals Report
Go to Experience → Core Web Vitals. This report shows how your pages perform on Google’s page experience metrics — LCP, CLS, and INP — as measured by real user data collected by Chrome. Pages are categorized as Good, Needs Improvement, or Poor.
This is the only place you can see your Core Web Vitals performance as Google actually measures it on real visitors, rather than in a lab test. My Core Web Vitals guide explains what each metric means and how to improve your scores.
Manual Actions
Go to Security and Manual Actions → Manual actions. On a healthy site this will show “No issues detected.” If Google has applied a manual penalty to your site — for spammy links, thin content, or other policy violations — it will appear here along with details of what triggered it. Check this once after setup and then periodically.
How to Request Indexing for a New Post
After publishing a new post or page, you do not have to wait for Google to discover it on its own. You can request indexing directly through GSC using the URL Inspection tool.
- Click the search bar at the top of GSC and enter the full URL of your new post
- GSC will check whether the URL is indexed and show its current status
- If the URL is not yet indexed, click “Request Indexing”
- Google adds the URL to its priority crawl queue — indexing typically happens within a few days, sometimes faster
This does not guarantee immediate indexing, but it does speed up the process compared to waiting for Googlebot to find the page through normal crawling. I use this every time I publish a new post or make a significant update to an existing one.
Good Habits for Using GSC Regularly
GSC is most valuable when you check it consistently rather than only when something goes wrong. Here is how I approach it:
- Check the Coverage report weekly — look for any new errors or pages dropping out of the indexed count
- Review the Performance report monthly — track impressions, clicks, and average position trends over time; compare the current month to the previous month and to the same period last year
- Use the URL Inspection tool every time you publish or significantly update a post
- Check Core Web Vitals after making any performance-related changes — caching, image optimization, plugin updates
- Run a technical SEO audit periodically and use GSC data as your primary source of issues to investigate
Understanding your internal linking structure also becomes more informed once you have GSC data — you can see which pages have strong impressions and use internal links to push PageRank toward pages that need a boost.
Canonical tag issues also show up in GSC — if Google is choosing a different canonical than the one you specified, the Coverage report will flag it. My canonical tags guide explains how to interpret and fix these situations.
Frequently Asked Questions
Is Google Search Console free?
Yes, completely free. There is no paid version. You just need a Google account to access it.
How long does Google Search Console verification take?
The HTML tag and GA4 verification methods are almost instant — usually within a minute or two after saving the tag to your site. DNS verification can take anywhere from a few minutes to 48 hours depending on how quickly your DNS changes propagate.
Can I add Google Search Console to multiple WordPress sites?
Yes. You can add and manage as many properties as you need under one Google account. Each site is a separate property with its own data and reports.
Does Google Search Console show all the keywords my site ranks for?
GSC shows queries that generated at least one impression in Google Search over the selected date range. It does not show every keyword you theoretically rank for — only those that appeared in search results and were seen by at least one user. Some low-volume or very competitive queries may not appear because impressions are below the reporting threshold.
How often should I check Google Search Console?
For most website owners, checking GSC once or twice a week is enough. Review indexing issues regularly, request indexing for new content, and monitor performance trends monthly rather than reacting to daily fluctuations.
What is the difference between Google Search Console and Google Analytics?
Google Search Console shows how Google crawls, indexes, and ranks your site — it is about your site’s presence in search. Google Analytics shows what users do when they visit your site — it is about behavior and traffic. They serve different purposes and are most powerful when used together, linked through the GSC integration in GA4.
My site was verified but I am not seeing any data yet. Is something wrong?
No, this is normal. GSC needs time to collect data after verification. Performance data typically begins appearing within a few days, though the first 24 to 72 hours after verification may show very limited data. If your site is brand new, it may take longer for Google to crawl and index enough pages to generate meaningful reports.
Should I submit individual page URLs or just the sitemap?
Submit the sitemap first — it gives Google a complete map of all your URLs in one go. Then use the URL Inspection tool to request indexing for individual high-priority pages after publishing. You do not need to submit every URL manually; the sitemap handles bulk discovery and the URL Inspection tool handles individual priority submissions.
What should I do if the robots.txt file is blocking Googlebot?
Check your robots.txt file to confirm what is being blocked. A common WordPress issue is the entire site being blocked by a Disallow: / directive left over from a development or staging setup. In Rank Math or Yoast, you can edit the robots.txt file directly from the SEO plugin settings without needing FTP access.