If you manage a WordPress site and you are not regularly checking the GSC Coverage Report, you are flying blind on one of the most important aspects of your site’s search performance. This report — now officially called the Pages Report in Google Search Console — is the closest thing to a direct conversation with Google about your site’s indexing health. It tells you which pages Google has indexed, which ones it has not, and most importantly, why.
I check this report as a standard part of every technical SEO audit I run, and it consistently surfaces issues that would otherwise take weeks to diagnose through URL Inspection alone. A site with 50 indexed pages and 200 excluded pages has a serious problem — and without the Coverage Report, you would never know.
This guide walks through exactly how to read the report, what each section and status means, how to prioritize which issues to fix first, and how to validate your fixes once they are done.
When Should You Use This Report?
Use the Pages Report when:
- New pages are not getting indexed
- Indexed pages suddenly disappear from Google
- Organic traffic drops unexpectedly
- You suspect crawl or indexing issues
- You want to monitor overall indexing health after site changes
What Is the GSC Coverage Report (Pages Report)?
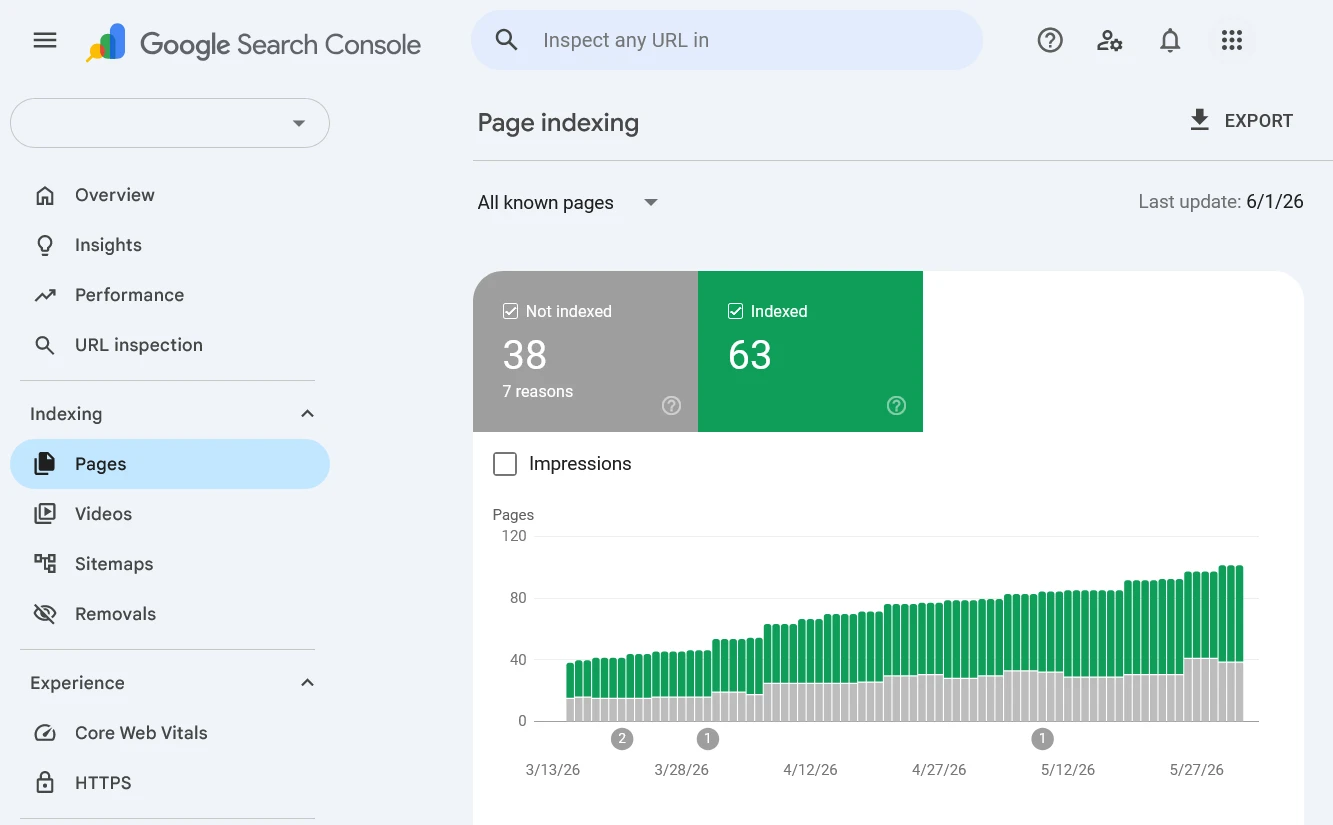
The GSC Coverage Report — which Google now labels as the Pages Report inside Search Console — is a site-wide view of every URL Google has discovered for your website and what happened when it tried to crawl and index each one. Unlike the URL Inspection tool, which looks at one page at a time, the Coverage Report shows you patterns across your entire site simultaneously.
You will find it in Google Search Console under Indexing → Pages in the left sidebar. If you have used GSC for a while, you may remember it as the Index Coverage Report — same report, renamed. Most SEOs still refer to it as the Coverage Report, and you will see both terms used interchangeably online.
The report is split into two views you can toggle between:
- All known pages — every URL Google has discovered for your site, regardless of how it found them (sitemap, internal links, external links)
- Filtered by sitemap — only URLs from a specific submitted sitemap
Always start with “All known pages” for a complete picture. Filtering by sitemap is useful later when you want to confirm whether a specific sitemap is working correctly.
Understanding the Four Status Categories
The Coverage Report organizes every discovered URL into four categories. Understanding what each category actually represents — and what it does not — is the foundation of using this report correctly.
Error (Red)
Pages in this category could not be indexed due to a specific technical problem. These are your highest priority items. Error pages are actively failing — Google tried to crawl or index them and hit a blocking issue. Every page in this category is invisible in Google Search and will remain so until the underlying error is resolved.
Common errors you will see here include server errors (5xx), 404 Not Found, redirect errors, and 403 Forbidden responses. Each error type shows you exactly how many pages are affected and lets you drill into the specific URLs.
Valid with Warning (Yellow/Orange)
These pages are indexed — Google has added them to its database — but something about them raised a flag. The most common warning is “Indexed, though blocked by robots.txt,” which means Google indexed the page despite your robots.txt suggesting it should not crawl it. This is not as contradictory as it sounds — robots.txt blocks crawling, not indexing, and Google can index a URL it discovers through links even if robots.txt tells it not to crawl.
Warnings are not as urgent as errors, but they should not be ignored. An indexed page that is also blocked by robots.txt is a misconfiguration that could cause problems if Google decides to stop indexing it in the future.
Valid (Green)
These pages are indexed with no issues detected. This is where you want your important pages to be. The number here is your effective indexed page count — the pages that can actually appear in Google Search results.
Do not assume the Valid count is always accurate though. Check it against your actual published content. If you have 80 published posts but only 45 are in the Valid category, something is happening to the other 35 — and they will appear in one of the other three categories.
Not Indexed (Grey)
This is typically the largest category on most sites, and it is also the most nuanced. Not indexed does not automatically mean something is wrong. Pages end up here for two very different reasons:
Intentional exclusions — pages you deliberately excluded from the index via noindex tags, robots.txt blocks, or canonical tags. These belong in this category and you should not try to fix them.
Unintentional exclusions — pages Google decided not to index due to quality issues, duplication, crawl budget constraints, or technical problems. These need investigation.
The key skill when using the Coverage Report is distinguishing between these two types within the Not Indexed category. I will cover how to do that in the next section.
How to Read the Not Indexed Section Correctly
When you click on the Not Indexed category, GSC breaks it down further into specific reason types. Each reason has its own row with a count of affected URLs. Here are the ones that matter most and what they actually indicate:
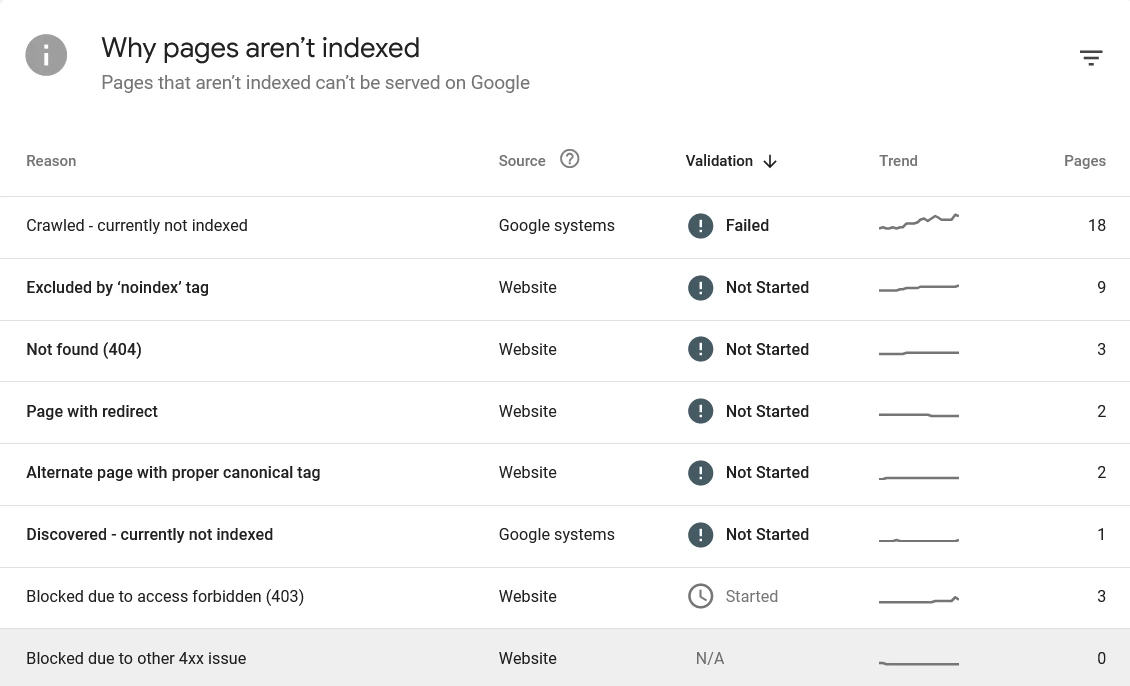
Crawled — Currently Not Indexed
Google visited these pages, successfully rendered them, but chose not to add them to the index. This is a content or quality signal — Google evaluated what it found and decided the pages did not meet the threshold for indexing. Common causes are thin content, pages too similar to other indexed pages on your site, or content that does not offer anything beyond what already exists in Google’s index.
This is the status that requires the most honest content evaluation. Do not just request indexing on these pages — read them with fresh eyes and ask whether they genuinely serve a searcher better than existing indexed alternatives. I cover the full diagnosis process in my guide to why pages are not indexed by Google.
Discovered — Currently Not Indexed
Google found these URLs but has not yet crawled them. They are sitting in the crawl queue, waiting. The most important signal to check here is whether these pages have real internal links pointing to them from already-crawled pages — or whether they are effectively orphan pages that Google found only via sitemap with no path to reach them through your site’s link structure.
A large number of URLs in this status often indicates a crawl budget issue — Google is not prioritizing these pages highly enough to crawl them promptly. Strengthening internal links from high-authority pages to these URLs is the most effective fix.
Duplicate Without User-Selected Canonical
Google found multiple pages with similar or identical content and decided to index one of them as the canonical version — but you did not explicitly tell it which version to prefer. Google made the choice for you, and it may not have chosen the page you wanted. Fix this by adding explicit canonical tags to your preferred versions.
Duplicate — Google Chose Different Canonical Than User
You declared a canonical tag, but Google overrode it and chose a different URL. This is Google telling you it disagrees with your canonical declaration. Simply re-asserting the same canonical will not fix it — you need to understand why Google prefers the other URL (usually stronger internal links, faster load time, or more comprehensive content) and address the underlying disparity.
Page with Redirect
These URLs redirect to another destination. They are not indexed directly — Google indexes the redirect destination instead. If you see a large number of these, check whether your XML sitemap is submitting redirect URLs rather than the final destination URLs. Sitemaps should only contain the canonical, final destination URLs — submitting redirect URLs wastes crawl budget unnecessarily.
Blocked by robots.txt
Your robots.txt is preventing Googlebot from crawling these pages. Check whether this is intentional. A Disallow rule that is too broad can accidentally block important content. Always review your robots.txt after theme updates or plugin changes, as these sometimes regenerate or overwrite the file.
Blocked by noindex Tag
These pages have a noindex directive. Again — check whether this is intentional for each URL. The most dangerous version of this error is an accidental site-wide noindex, which can happen when the “Discourage search engines” option in WordPress Settings → Reading is left enabled after development, or when an SEO plugin setting is incorrectly applied to an entire post type or category.
Soft 404
The page returned a 200 OK response to Googlebot but the content signals that the page is effectively empty or does not exist — for example, a product page that shows “Item not available” with no other content, or a search results page with no results. Google treats these as functional 404s even though the server says the page exists. Fix by either adding real content to the page or returning a proper 404 or 301 response.
Not Found (404)
These URLs return a genuine 404 response. Some of these may be expected — pages you deleted intentionally. Others may be URLs that once had content and should have been redirected. Cross-reference these against your internal links and any known URL changes. Any URL in this list that previously ranked or had inbound links should have a 301 redirect pointing to its replacement. I cover the full process in my guide to fixing WordPress 404 errors.
Server Error (5xx)
Googlebot visited these URLs but the server crashed or timed out. Frequent 5xx errors across multiple pages suggest a hosting or server resource issue — PHP memory limits, database query timeouts, or resource spikes during crawling. Consistent 5xx errors on specific pages may indicate a plugin conflict or a page that triggers an unusually heavy process. See my guide on fixing WordPress server errors for diagnosis steps.
Alternate Page with Proper Canonical Tag
Google found this page but is indexing another version instead because a canonical tag points elsewhere. In most cases this is expected behavior and does not require action. Review a few examples to confirm Google is indexing the preferred URL.
How to Prioritise What to Fix First
A typical Coverage Report on a site with a few hundred pages can show dozens of different issues affecting hundreds of URLs. Trying to fix everything at once is not practical. Here is the priority order I use:
Priority 1 — Errors on your most important pages. Click into each error type, sort by URL, and identify whether any of your key pages — pillar posts, service pages, homepage — are in the error category. A single high-value page with a 403 or server error is more urgent than 50 tag archive pages with soft 404s.
Priority 2 — Patterns affecting many pages at once. If a single error type is affecting 100+ URLs, there is likely a systemic issue — a misconfigured plugin, an overly broad robots.txt rule, or a server configuration problem. Fixing the root cause resolves all affected URLs simultaneously.
Priority 3 — Crawled but not indexed pages that should be indexed. These are your published posts and pages that Google visited and rejected. These require content-level fixes — improving quality, reducing duplication, strengthening internal links — before resubmission.
Priority 4 — Discovered but not indexed pages. Strengthen internal links to these pages and ensure your caching layer is not serving stale cached versions of the linking pages to Googlebot.
Do not prioritise: Intentional noindex pages, tag and category archives you deliberately excluded, paginated URLs, and admin-area pages that are correctly blocked. These are expected exclusions and fixing them would be counterproductive.
How to Use the Coverage Report Alongside URL Inspection
The Coverage Report and URL Inspection tool are complementary — they answer different questions and you need both.
The Coverage Report answers: What is happening across my whole site? Are there patterns I should know about? How many pages are affected?
The URL Inspection tool answers: What happened specifically with this one URL? When did Google last crawl it? What did it see? What is blocking it?
The right workflow is to use the Coverage Report to identify which issues and how many pages are affected, then use URL Inspection to drill into specific representative URLs from each issue type to understand the root cause. Once you understand the root cause from URL Inspection, you apply the fix at scale — whether that is updating your SEO plugin settings, editing robots.txt, or improving a batch of similar pages.
For a complete breakdown of what each individual URL status means and how to act on it, see my post on GSC indexing statuses explained.
How to Validate Your Fixes in GSC
Once you have fixed an issue, do not just wait and hope Google picks it up. GSC has a built-in validation workflow that lets you tell Google a fix has been applied and track whether it worked.
Here is the process:
- In the Coverage Report, click on the specific error or warning type you have fixed
- You will see a list of affected URLs — click the “Validate Fix” button at the top of the list
- GSC will begin re-crawling the affected URLs to verify the fix is in place
- Validation status changes from “Not started” to “Started” to either “Passed” (fix confirmed) or “Failed” (issue still present)
Validation can take anywhere from a few days to a few weeks depending on the crawl priority of the affected URLs and how many pages are involved. During validation, GSC will notify you if it finds that the fix has not resolved the issue on some or all affected pages.
Important: only click “Validate Fix” after you have actually made the fix. Clicking it on an unresolved issue restarts the validation clock without changing the outcome, and repeated failed validations can affect how Google prioritizes crawling those URLs.
How to Use the Sitemap Filter Effectively
The Coverage Report lets you filter results by a specific submitted sitemap. This is particularly useful for diagnosing whether a specific sitemap is working correctly — for example, if you have a separate post sitemap and a page sitemap, you can check each one independently.
When you filter by sitemap, check the difference between the “All submitted URLs” count in your sitemap versus how many are showing as Valid in the Coverage Report. A large gap between submitted and indexed URLs within a specific sitemap indicates that sitemap has a problem — either the URLs themselves have issues, or the sitemap contains URLs that Google is choosing not to index.
Also check for “Sitemap could not be read” errors in the Sitemaps report (under Indexing → Sitemaps) — these indicate formatting errors in the XML file itself that prevent Google from processing it.
A URL appearing in a sitemap does not guarantee indexing. Sitemaps help Google discover URLs, but indexing decisions are still based on content quality, duplication signals, and crawl prioritization.
Reading the Coverage Report as a Site Health Indicator
Beyond fixing specific errors, the Coverage Report is valuable as a long-term site health indicator. Here is what healthy coverage trends look like on a well-maintained site:
- Valid (indexed) count grows steadily as new content is published
- Error count stays low or zero — any spikes should be investigated immediately
- Not indexed count includes mostly intentional exclusions (tags, archives, admin pages)
- The ratio of Valid to total discovered URLs stays reasonably high — a site where only 20% of discovered URLs are Valid has significant quality or duplication issues
A sudden drop in the Valid count — pages falling out of the index without being deleted — is one of the earliest signals of a Google algorithm update affecting your site, a technical issue that broke indexing across multiple pages, or a content quality re-evaluation. Catching this early through regular Coverage Report monitoring means you can investigate before rankings drop significantly.
I recommend checking the Coverage Report at minimum once a month as part of a routine technical SEO check, and immediately after any major site changes — theme updates, plugin changes, URL restructuring, or hosting migrations.
Common Mistakes When Using the Coverage Report
Trying to index everything in the Not Indexed category. Many of those exclusions are correct and intentional. Blindly requesting indexing on tag archives, paginated URLs, and admin-area pages wastes your daily submission quota and can dilute your site’s overall index quality.
Fixing errors without understanding the root cause. If 50 pages are showing a server error, fixing them one by one is not the answer — find the systemic cause and fix it once. The Coverage Report groups issues by type specifically to help you identify patterns.
Ignoring the Valid with Warning category. These pages are indexed, so they often get overlooked. But an “Indexed, though blocked by robots.txt” warning means your robots.txt and your indexing intentions are inconsistent — something that should be cleaned up even if it is not causing an immediate problem.
Not re-checking after fixes. Use the Validate Fix workflow — do not just fix an issue and assume it resolved. Validation gives you confirmation from Google that the fix was recognized, and it alerts you if the fix only partially worked.
Checking the Coverage Report only when something goes wrong. The most valuable use of this report is proactive monitoring, not reactive troubleshooting. Regular checks catch issues while they are small — before they affect a significant number of pages or cause ranking drops.
Frequently Asked Questions
What is the GSC Coverage Report?
The GSC Coverage Report — now called the Pages Report inside Google Search Console — is a site-wide view of every URL Google has discovered for your website and its indexing status. It categorizes all discovered URLs into four groups: Error (pages that could not be indexed due to a technical problem), Valid with Warning (indexed but with a flag), Valid (successfully indexed), and Not Indexed (excluded for various reasons). It is the fastest way to identify indexing patterns and issues across your entire site without having to check each page individually.
What is the difference between the Coverage Report and URL Inspection?
The Coverage Report gives you a site-wide view — it shows patterns across all discovered URLs simultaneously and groups issues by type. URL Inspection is a single-page diagnostic tool — it shows you exactly what happened with one specific URL, including when it was last crawled, what Googlebot rendered, and what is blocking it. Use the Coverage Report to identify which issues exist and how many pages are affected, then use URL Inspection to diagnose the root cause on specific representative pages.
Should all pages on my site be in the Valid (indexed) category?
No — and this is one of the most common misconceptions about the Coverage Report. Many pages on your site should be excluded from the index: tag and category archives, paginated URLs, author pages, admin-area pages, search results pages, and any other pages that do not add unique value for searchers. The goal is not to maximize the Valid count — it is to ensure all your important, high-quality content is indexed, while low-value pages are correctly excluded. A smaller, higher-quality index is healthier than a large index full of thin or duplicate pages.
How often should I check the GSC Coverage Report?
At minimum once a month as part of routine site maintenance, and immediately after any major site change — theme updates, plugin changes, URL restructuring, or hosting migrations. Also check it any time you notice a drop in organic traffic or rankings, as a sudden decrease in the Valid count is often an early indicator of an indexing problem or algorithm update impact. Setting up GSC email alerts can help you catch sudden changes between your regular checks.
Why is the “Crawled — currently not indexed” count increasing on my site?
An increasing “Crawled — currently not indexed” count usually signals one of two things: Google is re-evaluating your content quality and deciding more pages do not meet its indexing threshold, or you are publishing content that is too similar to existing indexed pages on your site. Since early 2024 Google has become noticeably stricter about what it considers worth indexing, with a greater emphasis on content that offers genuine unique value. Review the affected pages honestly — if they cover the same ground as other indexed pages on your site without adding meaningful differentiation, consolidation or significant improvement is the right fix.
Common examples include thin category descriptions, near-duplicate blog posts, outdated content, AI-generated pages with little unique value, and pages that attract very few internal links.
What does “Validate Fix” do in the Coverage Report?
Validate Fix tells Google that you have addressed a specific error or warning and asks it to re-crawl the affected URLs to confirm the fix is in place. It triggers a re-crawl of the URLs in that error group and updates the validation status from “Not started” to “Started,” then eventually to “Passed” or “Failed.” Only click Validate Fix after you have actually implemented the fix — clicking it on an unresolved issue restarts the clock without changing the outcome. Validation typically takes a few days to a few weeks depending on how many pages are involved and their crawl priority.